iPad for PowerPoint Presentations
Recently, I read an article that talked about various approaches and issues with presenting a PowerPoint presentation from an iPad. The general information on technologies and ultimately issues to be aware of when importing a PowerPoint presentation into Keynote were all good. Also, I think the iPad is fantastic and one gets used daily here at TLC.
But the conclusions should definitely make everyone concerned with the ability to present anything visually dynamic at this point on the iPad:
“While the iPad is a credible candidate for road warrior presenting, content authors need to take care with the content they generate. The golden rules can be summarized as:
1. Keep it simple – don’t use advanced features of PowerPoint as it’s likely Keynote will not support them.
2. Fonts – make sure you are only using one or more of the 7 common fonts (see appendix below).
3. Transitions – use fade and wipe only.
4. Video – don’t use it unless you’re a video formats wizard!
5. Aspect Ratio – Design for 4:3 aspect ratio before you start doing anything.
6. Graphics Engine – Don’t manipulate images in any way in PowerPoint. Do it externally and then import the finished image or use the copy/paste special trick.”
Based on expert opinion, a presentation should not use animation, transitions, any image effects, any text effects, video or specialty fonts… I think that describes presentations developed with PowerPoint 95.
– Troy @ TLC
How To Move An Object Seamlessly With Multiple Motion Paths
Motion path animations are a great feature, but using them beyond the basic can be confusing. For example, here is the slide from yesterday’s timeline sample:
The animation effect was great and the design of it relied on a lot of motion paths. This is a quick step-by-step example of moving an object to two positions with motion paths.
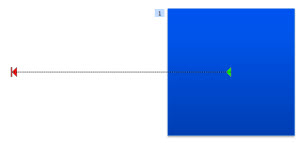
1. The blue box is the object to move. First to area “1” and then to area “2.”
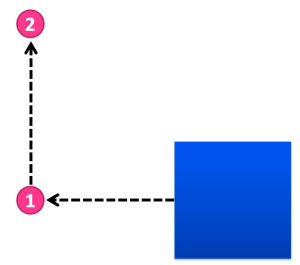
2. Moving to area “1” is easy. Select the box and add a Motion Path to the left.
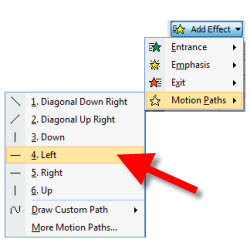
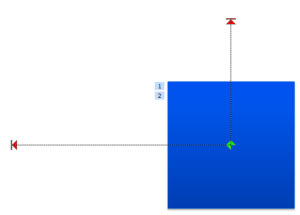
3. To move to area “2” is a bit more involved. First, add a Motion Path up. Note: It is added to the existing position. During slide show the box will move to the left, then jump back to the original location and move up – not the seamless effect wanted.
4. Select the “up” motion path. Note: You must be in the Animation tab to view motion paths and select them. Then, click and drag it over so it’s green start is exactly aligned with the first motion paths red end.
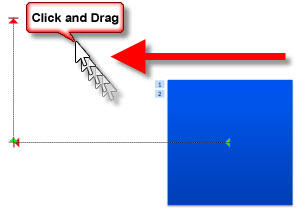
5. Done. Now, the box will seamlessly move to area “1” and then up to area “2.”

Download presentation with this sample animation (17K). Note: if your browser changes downloaded file to”.zip” rename to “.pptx”.
– Troy @ TLC
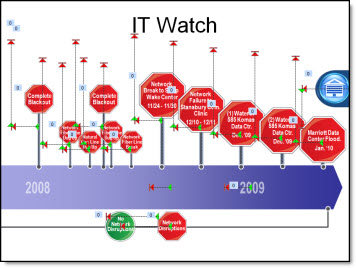
Stopsigns on the Timeline
Timelines are a staple for presentations. But memorable, content applicable, and legible timelines are not. Here is a timeline developed for a recent client that tied in with the visual style of the presentation and emphasized the key message with animation.
[youtube src=”https://www.youtube.com/embed/CsTi7dV7now?rel=0″]
The timeline was spread across two slides to make the design (and modification) easier. In the full presentation there were several on-click animations to coordinate with the speaking points and the slide transition acted as one of the clicks to advance to the next point.
– Troy @ TLC
35 PowerPoint Template Projects (TLC Portfolio)
I have compiled a PDF that highlights 35 PowerPoint templates developed in 2010. The goal is provide a simple annual portfolio of template projects for reference on the diversity of clients and design styles.
For 2010, I had over 125 template projects. This is was simplified to include only 4×3 templates (no 16×9 widescreen or custom aspect ratios), publicly viewable and with no client content. Also, most templates include more than a Title and Content background and layout, but for a simple approach this is all that is included. Finally, all projects are specific to a paying client and templates cannot be released to anyone other than that client, so this is only a portfolio piece.
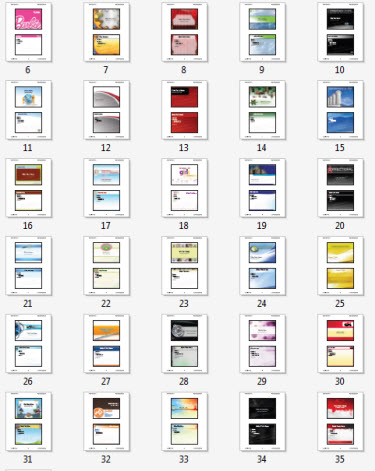
Download the 2010 PowerPoint templates portfolio PDF here (8.8 MB ).
– Troy @ TLC
Fonts Installed With Each Operating System – Since Windows 95
Some things should be easy to look up, find and reference. Some things are not easily found. Such was the case when I needed to answer a simple question – “Is that font installed with Windows 2000?” Of course, I could not reply with my first thought (“Why are you using Windows 2000!”) as that would most likely not create a good relationship with a new client. And because I no longer have any Windows 2000 computers to check, I did a quick web search. An hour later, I was frustrated with using an hour of my day to answer a simple question, that I should know the answer to.
So, several more hours of research and design and I am confident I can avoid this situation again. Here is my solution, a list of fonts installed with each Windows Operating System since Windows 95 (and yes, Windows Millenium is missing – I purposefully chose to skip over it):
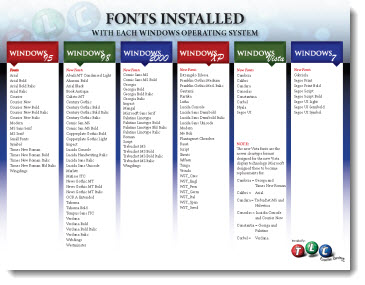
Note: No guarantee that nothing is missing, especially if using a non-English install.
Download the PDF here.
– Troy @ TLC
6 PowerPoint tips for young PR and marketing professionals
This article was posted this week in the Midland Daily News. It is short, clear and has a good summary of items to consider when developing a presentation.
(Summary)
1. Use the audience’s language.
2. KISS – Keep It Short and Sweet.
3. Be consistent.
4. Prove your points.
5. Call to action.
6. Review the presentation.
View the full story here.
– Troy @ TLC
Baseline Shift/Offset Any Text, Any Amount
If you need a custom super-script registration mark, or special text layout, using the OFFSET option can be the solution. Select text to adjust, open font dialog, and customize the Offset box.

Here is the standard super-scripted registration mark and a customized registration:

Another use of the text offset can be custom layouts such as this:
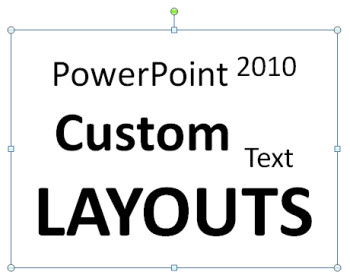
Note: I am not saying this is a good layout idea, just that it is possible all within one text box.
– Troy @ TLC