tutorial

Use Windows 7 Presentation Setting Before Every Presentation

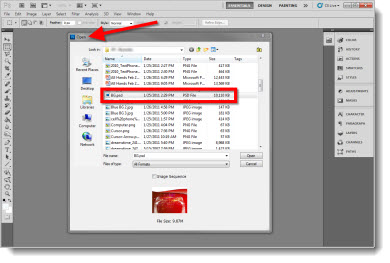
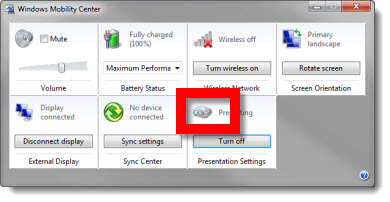
If you present with PowerPoint and use Windows 7, you need to be familiar with the PRESENTATION SETTINGS option. To access, open the MOBILITY CENTER (see 03/22/11 post) by clicking the Windows + X keys. Then click projector icon.

In the PRESENTATION SETTINGS dialog in the “WHEN I AM GIVING A PRESENTATION” section be sure:

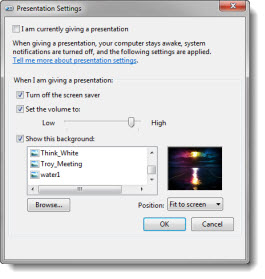
1. The TURN OFF THE SCREEN SAVER option is active.
2. The SET VOLUME option is active (I set volume to 90%). This option overrides the mute control.
3. I size the event theme graphic to the monitor resolution and set that image as the desktop background when presenting. For that “just in case” situation, so if all fails the audience sees something related to the event (I have seen kids, puppies, girlfriends, vacation pictures, etc. show up on screen – all not good options).

Note: At the top the I AM CURRENTLY GIVING A PRESENTATION option is also turned on and off through the Mobility Center.
– Troy @ TLC

By |2016-08-16T10:23:25-07:00March 24th, 2011|Resource/Misc, Tutorial|

Use Windows 7 Mobility Center Before Every Presentation

Windows 7 is great – running on virtually every computer here. There are a number of hidden features that are very important to presenters. The WINDOWS MOBILITY CENTER is one of them.

To open the Mobility Center, hold down the Windows key and the X key

I use this as a quick check for:
1. Confirm computer volume
2. Confirm plugged into to power (not on battery)
3. Confirm Maximum Performance power setting (vs. battery saving low power option)
4. Wireless network turned off
5. Computer sees an external display/projector
6. Presentation Settings are active (covered in next post)

Everything seen here can be accessed separately, but this is an easy 1-stop view of them all.

– Troy @ TLC

By |2016-08-16T10:23:46-07:00March 22nd, 2011|Resource/Misc, Tutorial|

Open PhotoShop File as Flat Composite

Unfortunately, in general, Microsoft does not work well with layered Photoshop (.psd) files. This includes Windows Explorer previewing them or PowerPoint being able to insert them. I do a lot of work in Photoshop, so I have a lot of Photoshop files for each presentation project. Sometimes, it is a time trap waiting for Photoshop to open the files just to identify if it is a needed file for the presentation. This is especially true when I receive 1-2-30GB files from a graphic department. It takes even a fast computer some time to process a 30GB file with upwards of 50 layers.

Here is a quick way to open, view and identify what those large files are.

1. In Photoshop, go to FILE>>OPEN and select the .psd file

2. If the OPEN button is clicked, the full file opens, including all of the layers

3. But if the SHIFT and ALT keys are held down, then the OPEN button the file opens as a flattened composite image

The advantage is the file, any size, opens instantly. The disadvantage is if layers are turned off they are not visible. I generally create a small .jpg with the same file name for easy reference in Windows explorer.

– Troy @ TLC

By |2016-08-16T10:24:25-07:00March 16th, 2011|Tutorial|

Manage Multiple Time Zones with Windows 7

Last week, when working on the East Coast, a different time zone than home, I was asked how I managed to keep track of things in the different time zones. Windows 7 has a great little feature to add multiple time zones to the clock.

1. Click the time in the lower right on the task bar and click “CHANGE DATE AND TIME SETTINGS”

2. In the DATE AND TIME dialog, go to the ADDITIONAL CLOCKS tab and setup 1 or 2 additional time zones and name them

3. Now the taskbar shows both (or all three) time zones

4. If you click on the time in the task bar, you now see clocks for both time zones active there as well

– Troy @ TLC

By |2016-08-16T10:26:28-07:00February 22nd, 2011|Personal, Resource/Misc|

How To Move An Object Seamlessly With Multiple Motion Paths

Motion path animations are a great feature, but using them beyond the basic can be confusing. For example, here is the slide from yesterday’s timeline sample:

The animation effect was great and the design of it relied on a lot of motion paths. This is a quick step-by-step example of moving an object to two positions with motion paths.

1. The blue box is the object to move. First to area “1” and then to area “2.”

2. Moving to area “1” is easy. Select the box and add a Motion Path to the left.

3. To move to area “2” is a bit more involved. First, add a Motion Path up. Note: It is added to the existing position. During slide show the box will move to the left, then jump back to the original location and move up – not the seamless effect wanted.

4. Select the “up” motion path. Note: You must be in the Animation tab to view motion paths and select them. Then, click and drag it over so it’s green start is exactly aligned with the first motion paths red end.

5. Done. Now, the box will seamlessly move to area “1” and then up to area “2.”

Download presentation with this sample animation (17K). Note: if your browser changes downloaded file to”.zip” rename to “.pptx”.

– Troy @ TLC

By |2016-08-16T10:30:15-07:00February 4th, 2011|Tutorial|

Create a Panoramic Image in Photoshop

Sometimes presentations need specialty images that are beyond the capabilities of PowerPoint. Here is my process for creating panoramic images:

1. Take a series of photos, aligning as close as possible. Here are my sample images – 4 photos taken from the 11,000′ elevation peak at BrianHead ski resort in Utah.

2. Open PhotoShop and import all images as separate layers. Be sure the layers are in order of what will be the side-by-side order.

3. With all 4 layers selected go to EDIT >> AUTO-ALIGN LAYERS.

4. In the Auto-Align Layers dialog there are a number of options, for this one I am going to use AUTO.

5. The result is (1) a super wide image, that is (2) made up of the layers, each repositioned side-by-side.

6. Then use the cropping tool to remove excess areas and create a clean rectangle.

7. Because my images have slightly different exposures, the individual images can still be seen. First I quickly apply an AUTO TONE, AUTO CONTRAST, AUTO COLOR to each layer. Then I use the eraser tool to blend the edges – which is easy because the AUTO ALIGN tool overlaps the images.

8. Now with the edges blended I have a super wide panoramic image ready to be saved as a .jpg and inserted into a presentation.

– Troy @ TLC

By |2016-08-16T10:39:49-07:00January 9th, 2011|Tutorial|

Creating the “Happy New Year” Text in PPT 2010

2011 started with a “Happy New Year” graphic and message. Creating the graphic was easy in PPT 2010.

1. Type text and size

2. Add style formatting (fill color and 3-D bevel)

3. Duplicate orginal black text slide and apply a custom 3-D bevel

4. Then customize the Surface Material and Lighting

5. Copy the colored text to the 3D perspective text slide and adjust size of each to match

6. I added the TLC company logo, then size/positioned to take place of the dot in the explanation point

The completed slide can be downloaded here.

– Troy @ TLC

By |2016-08-16T10:41:43-07:00January 3rd, 2011|Tutorial|

Gradients for Custom Text

Final gradient sample (for this series). In this slide the gradient fill is used for the text outline, the box outline and the box fill.

One of the really great features is the ability to make lines gradient. On the text close-up it is easier to see the outline is opaque white at the top and gradients into a semi-transparent grey.

1. Select text, open the Format Text dialog and choose TEXT OUTLINE
2. Change Text Outline to GRADIENT LINE
3. Add a white gradient stop. I moved mine to the right to extend the amount of solid white at the top of each letter
4. Add a 2nd stop that is black and semi-transparent (or use an opaque grey for same effect)

For the lower box I combined a gradient fill and a gradient outline. This is great to be able to create a single element with custom design and text all in one element.

For the box fill, the gradient is right-to-left:
1. Choose FILL and angle is 180
2. White stop that is slightly semi-transparent
3. Black stop that is transparent

For the box outline, the gradient is left-to-right:
4. Choose LINE COLOR and GRADIENT FILL with angle 0
5. White stop that is slightly semi-transparent
6. Black stop that is transparent

Also, I set the right indent on the TEXT BOX section to .3 to inset the text equally on all slides.

Download the Gradient Text slide here (34k) .

– Troy @ TLC

By |2016-08-16T11:01:47-07:00October 15th, 2010|Tutorial|

Movie Length When Trimming

PPT 2010 has added lots of very good video editing tools. In working on a recent project with many videos I happily made use of the Trim feature to set custom start/stop times. But after using a calculator to figure the new section duration (for over an hour), I discovered a new function!

Here is my sample video freshly inserted. The End Time shows the duration of the whole video.

Here is the sample video with custom start and stop times setup. Note the upper right corner where PPT is smart enough to automatically calculate and display the new duration of the video (yeah!)

– Troy @ TLC

By |2016-08-16T11:03:11-07:00September 28th, 2010|Tutorial|

Lance Armstrong Animated Slide

People ask all kinds of questions about slides created. If it is a cool topic like this one, Lance Armstrong, I hear “Wow, that is really awesome to work on stuff like that.” But the comment about the same slide from the client is usually, “How long did it take to create that really awesome slide…”. Just depends on your perspective.

But this was an awesome slide to have the opportunity to develop for a presentation. Awesome subject. Awesome photography. Awesome animation. Here is the image preparation needed in Photoshop:

1. Original Photo

2. Drop out background and have just Lance Armstrong

3. Make background without Lance Armstrong

4. Create motion streaks of Lance Armstrong speeding away (key for the animation)

5. Create semi-transparent background image

Here is what it took to create the animated slide:

1. start with opaque background image and .png image of Lance Armstrong (looks like original)

2. Fade in the motion streaks .png image

3. Grow/shrink and slight motion path on Lance Armstrong image and motion streaks. Fade out opaque background and fade in semi transparent background

4. Done. Total billable time – few hours. Result – (hopefully) audience wow.

– Troy @ TLC

By |2016-08-16T11:03:56-07:00September 23rd, 2010|Tutorial|
Go to Top