tutorial

Add Slides to a Presentation and Keep Their Original Look

Adding slides from one presentation into another and hoping for a button that will automatically format the slides the way needed is just not a feature in PowerPoint. But, the almost magical “Destination vs. Source Formatting” button does exist. For this tutorial, we are going to add slides from the “Blue” presentation (Presentation #1) to the “Purple” presentation (Presentation #2) and keep the blue slides blue (ie. opposite of the last tutorial where the slides updated to the purple template).

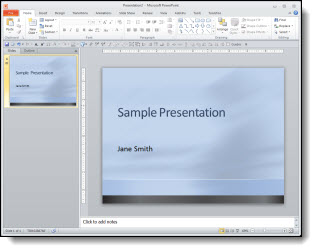
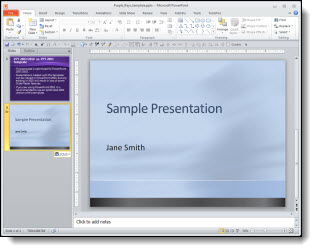
Here is our “Blue” presentation (#1):

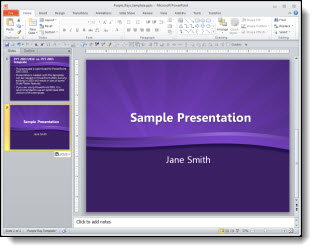
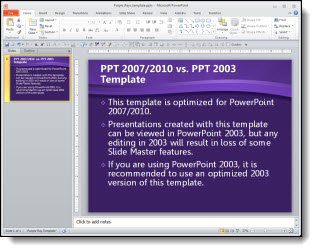
And here is our “Purple” presentation (#2):

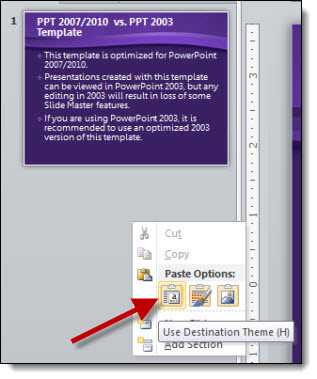
Select the slides from Presentation #1 and copy. Then paste them into Presentation #2. To paste in the new slides, right-click and in the pop-up menu in the “Paste Options” sections, select “KEEP SOURCE FORMATTING:”

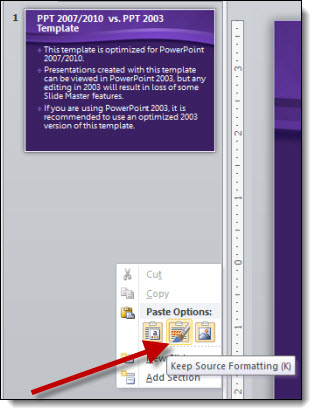
With the KEEP SOURCE FORMATTING option the template for the new slides keeps the template that was used in Presentation #1. So the blue slides stay blue.

Behind the scenes what happens is a new Master Slide set is added to the presentation. So if you look in the slide layouts (HOME >> SLIDES section >> LAYOUTS) there are two master slide sets to choose from (Presentation #1 and Presentation #2).

NOTE: If you paste in more slides from the Blue presentation in a new location and select KEEP SOURCE FORMATTING another blue master slide set will be added (which is not optimal).

– Troy @ TLC

By |2016-08-16T09:25:02-07:00April 8th, 2012|Tutorial|

Add Slides to a Presentation That Fit In

Adding slides from one presentation into another and hoping for a button that will automatically format the slides the way needed is just not a feature in PowerPoint. But, the almost magical “Destination vs. Source Formatting” button does exist. For this tutorial, we are going to add slides from the “Blue” presentation (Presentation #1) to the “Purple” presentation (Presentation #2) and make all of the slides the same, so they are all purple.

Here is our “blue” presentation (#1):

And here is our “purple” presentation (#2):

Select the slides from Presentation #1 and copy. The paste them into Presentation #2. To paste in the new slides, right-click and in the pop-up menu in the “Paste Options” sections select “Use Destination Theme:”

With the USE DESTINATION THEME option, the template for the new slides is assigned to the template used on the slide in front of the insert point. So now all of the blue slides are changed to the purple template.

*Note: There is no “magic” button and with this example the text boxes, background, colors used, etc. were all setup correctly using the template formatting (which also means it is a real template). When updating to the new (purple) template all of the master slide formatting carries over just fine. But there are lots of times when things are not based on template formatting and need to be manually updated (ie. no magic format button).

– Troy @ TLC

By |2016-08-16T09:25:27-07:00April 6th, 2012|Tutorial|

Use Background Fill For Great Graphic Elements

I have used this technique on some recent projects that we designed dynamic background art for. The idea uses a simple feature that is used little and creates really dynamic graphic elements that are amazingly easy to use. Here is my sample slide with a dynamic background (thanks to Amber for creating this sample slide and tutorial images).

1. Add a PPT shape of your choice, I am using a standard rectangle. Set it as the background (FORMAT >> BACKGROUND >> PICTURE).

2. Set the PPT shape to “No outline,” solid color fill and no styling.

3. With the shape selected, go to FORMAT >> open the shape options by clicking the small icon in lower right >> under FILL >> SLIDE BACKGROUND FILL (last option).

4. NOTE: The shape has now disappeared with only the shape selection lines visible.

5. What you do here determines the look you create. I am using 3D perspective and some styling options. Select the shape.
– Add 3D Rotation (we are starting the “Perspective Relaxed” preset).

– Add a 3D Format for a bevel effect (Circle bevel with the width at 7pt and height at 8pt).

6. Now we see the interesting effect when the background fill is combined with some shape styling.

7. To really create a dynamic visual the next step is to select the shape and modify the 3-D Rotation perspective to 120 degrees.

8. With the new 3D formatting we can really see the effect of the background fill in the shape.

9. To create a full Title Slide layout, the shape was enlarged for more depth and stretched across the slide. Then duplicated, reduced in size and moved under the subtitle text box. The background fill automatically adjusts to the new placement on the background to create new looks for the same shape

Click here to download the sample slide.

– Troy @ TLC

By |2016-08-16T09:29:58-07:00March 20th, 2012|Tutorial|

Theme or Source – Your Choice

When moving slides from one presentation to another, the slide formatting (based on the master slides) is your choice – if you use the Paste Dialog.

1. From any presentation, copy the slides either in the left pane or slide sorter.

2. Go to the presentation where the slides are to be added and paste them in.

3. To paste, click where new slides are to be added and right-click. From the pop-up dialog, under “Paste Options” select “Use Destination Theme.”

4. The pasted slides will take on the formatting from the master slide set in the presentation:

5. Or you can choose “Keep Source Formatting:”

6. With “Source Formatting” the new slides retain their orginal master slide and formatting:

The choice is yours!

– Troy @ TLC

By |2016-08-16T09:39:54-07:00January 8th, 2012|Tutorial|

Creating the % Number Gradient Style

Here is the example slide from the previous post (download link below).

Here is a quick how-to on creating the custom text style. The “regular” text is Arial, 24 pt, bolded. The stylized text is Arial Black, 125 pt, bolded, drop-shadow, outline and gradient fill (so think BIG)

To create the gradient fill:
1. Type = Linear (= one direction)
2. Angle = 90 degree (= top to bottom)
3. Gradient Stop 1 = white, position 28%, transparency 05 (solid)
4. Gradient Stop 2 = bright cyan, position 46%, transparency 05 (solid)
5. Gradient Stop 3 = muted blue, position 48% (very close to the other blue), transparency 05 (solid)
6. Gradient Stop 4 = white, position 75%, transparency 05 (solid)

To see this gradient in PowerPoint (2010 is my recommendation for gradients (over 2007)), download here. (43K)

– Troy @ TLC

By |2016-08-16T09:40:12-07:00January 5th, 2012|Tutorial|

Really Nice 3D Icons Created in PPT

Here is the end result:

This great 3D icon was developed entirely in PowerPoint 2010. Using standard shapes, 3D Perspective and the Shape Combine tools.

Here are steps to create:

1. Insert the tear drop shape from the shape menu.

2. Rotate the shape until the point is pointing down.

3. Change the color to a gray, and remove the outline.

4. Insert an oval shape, holding down shift to make it a perfect circle. Holding ctrl, it will expand from the center and place in middle of the tear drop shape.

5. Remove the outline from the circle, if there is one.

6. Select both shapes and group.

7. For the 3D rotation, we will need the group selected.

8. Select “off axis 2 left.”

9. For the 3D effects, we only need the tear drop shape selected.

10. Height: 19.5 pt, width 0 pt, depth 5 pt, material special effect >> soft edge, lighting >> three point, angle 190.

11. Now you have a 3D tear drop shape.

By |2016-08-16T09:42:00-07:00December 13th, 2011|Tutorial|

PPT Halloween Pumpkin

Using the Shape Combine/Subtract/Union tools TLC Creative designer, Jennifer, developed this great pumpkin entirely from standard PPT shapes.
[youtube src=”https://www.youtube.com/embed/yiD1hSN3cdM?rel=0″]

The development was basically 30 steps, which we captured as individual slides to create the video directly from PPT.

Here is what the slide looks like, which you can download here (47K) .

– Troy @ TLC

By |2016-08-16T09:46:40-07:00October 31st, 2011|Portfolio, Tutorial|

Custom Gradient Fill for Big Numbers

For this slide (see previous post for more info on it), I wanted the numbers to be a visual focal point. I also wanted to keep them as editable PPT text. By mixing the stylized text with more standard text, a nice slide layout was developed. The big number text was created by:

1. Make it big (this text is 125pt).

2. Give it a gradient fill – using colors that coordinate with the template color scheme.

3. Add a subtle outline (stroke) to the text to help it contrast for legibility.

4. Add a drop shadow.

The sample slide can be downloaded here.

– Troy @ TLC

By |2016-08-16T09:51:16-07:00October 7th, 2011|Personal, Portfolio, Templates/Assets|

How Do I Get an Embedded Audio File From a Presentation?

Another question I receive a lot goes directly with the previous post (about finding video files): “Where are audio/music files that are embedded inside the .pptx file?”

Here is one process for getting to the actual audio/music files that are embedded in a PPT 2010 file.

1. Locate the presentation file in Windows Explorer and make a duplicate of it (we are going to “break” it).

2. Change the file name from .pptx to .zip

3. When you change the file extension you will get this warning dialog – click “Yes.”

4. Double click to open the new .zip file.

5. Go into the “PPT” folder.

6. Go into the “Media” folder.

7. Copy any of the video files (.mp3, .wav, etc.) from here to a folder on your computer.

8. Done!

– Troy @ TLC

By |2016-08-16T09:53:27-07:00September 28th, 2011|Tutorial|

PPT 2003 Corruptions Errors After April 2011 Updates?

I know the developers at Microsoft have a big job. I know they create updates to help all users. I also know they do a lot of testing before anything is released (almost too much testing as it slows down their release cycle by months and years…). I know the focus is on the newer PowerPoint format, but I still have PPT 2003 (and PPT 2010) installed on all computers here.

A small small security update on Tuesday, April 12, 2011 has brought countless users to a stop as it looks at okay content as a potential threat – offers no options to override its action – and only allows presentations to be opened in a useless state – arghhh!

Here is the fix:

1. Close all applications.

2. Open the control panel (START >> CONTROL PANEL)

3. Select UNINSTALL A PROGRAM

4. Select VIEW INSTALLED UPDATES

5. Scroll down list and select SECURITY UPDATE FOR POWERPOINT 2003 (KB2464588) POWERPOINT

6. Select UNINSTALL

7. Follow any prompts to confirm. When done, open any PPT 2003 presentation as normal with no need to restart computer.

– Troy @ TLC

By |2016-08-16T10:19:20-07:00April 18th, 2011|Tutorial|
Go to Top