tutorial

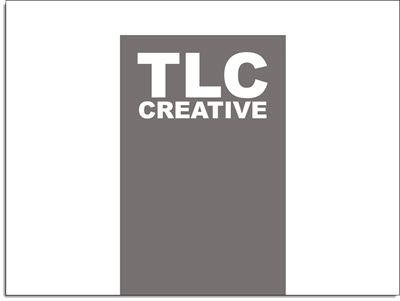
Slide Design Idea – Negative Space Text

A very nice design strategy used in print design is creating callouts and bold graphics with text created from the negative space.

Negative Space Text-7

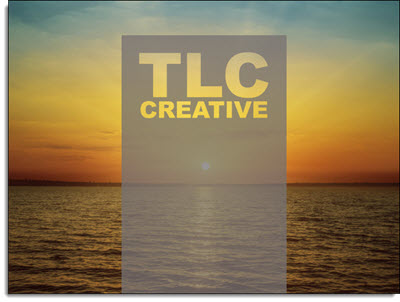
This same style is easily created within PowerPoint for slide design. The above example image was created in PowerPoint 2013 – here is how (thanks to Michelle on the TLC Creative design team for this tutorial).

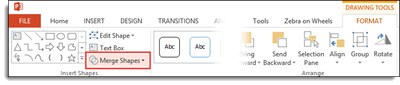
By using PowerPoint Combine Shapes tools (Combine, Intersect, Fragment, Subtract), the process is pretty easy.

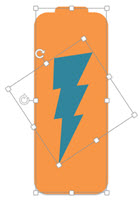
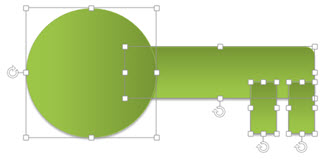
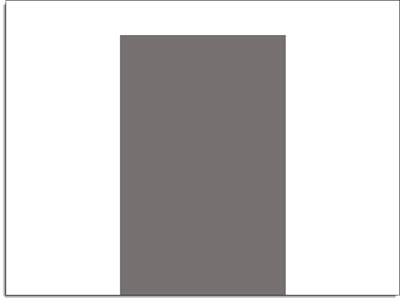
1. Add a shape of your choice – I am using a tall vertical bar.

Negative Space Text-1

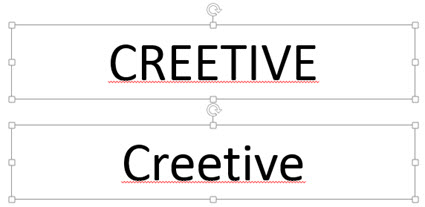
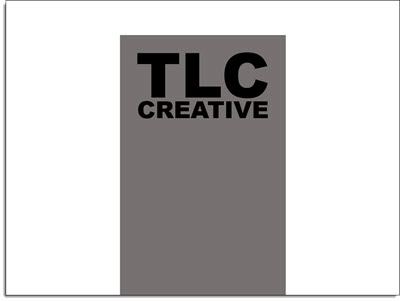
2. Add a separate text box with the text of your choice and format as desired – I am using “TLC Creative” in a typography styled stacked layout.

Negative Space Text-2

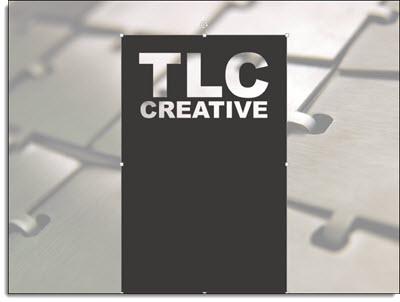
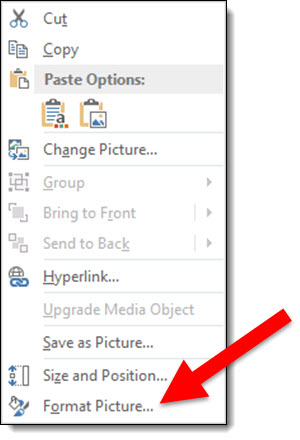
3. Select both objects – Note: Select the RECTANGLE first.

4. With both objects selected, go to FORMAT >> Merge Shapes >> Combine

Negative Space Text-3

Negative Space Text-4

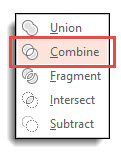
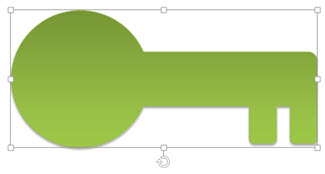
5. The text is “cut out” of the rectangle. Note: The text is no longer editable as it has been converted to a custom vector shape.

Negativce Space Text-5

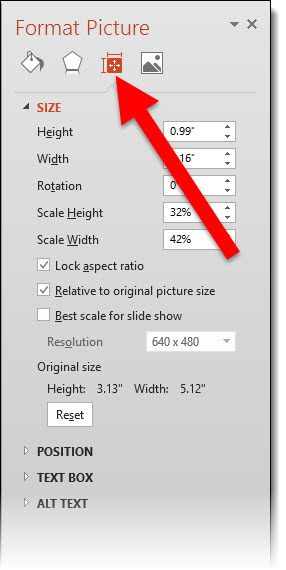
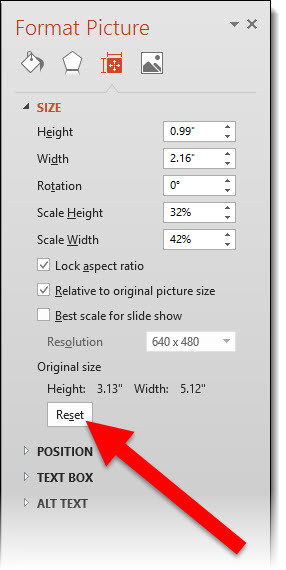
6. The shape is editable, like any other shape. All shaping styling options are available: fill color, gradient fill, transparency, bevel, drop shadow and more.

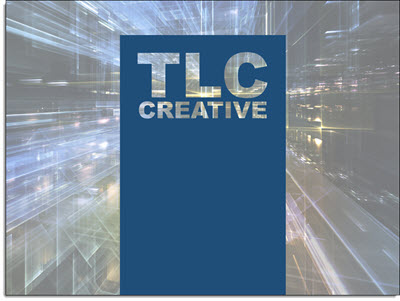
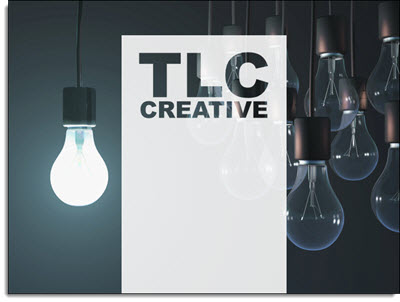
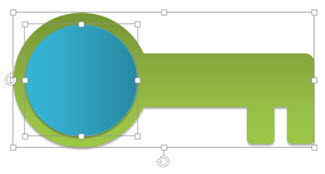
To really see the effects, place an image behind the new shape. A few examples:

Negative Space Text-11Negative Space Text-9NegSpaceText-8

By |2016-08-10T09:09:57-07:00February 16th, 2015|Resource/Misc, Tutorial|

Create Puzzle Pieces in PowerPoint

PowerPoint 2010 introduced the Merge Shapes toolset (trust me, it was hidden, but there). In PowerPoint 2013, the Merge Shapes toolset is much more accessible and refined. Here is an example we developed creating a much requested graphic element – puzzle pieces (download link below).


Here are the 4 puzzle pieces.

puzzle pieces-1

All are PowerPoint shapes


Here is a 4 step process to create your own:

1. Add 4 squares AND 4 small circles, so there are 8 shapes on the slide. COPY the 4 circles.

puzzle pieces-4

Select all shapes and subtract the circles from the squares to get these 4 shapes.

puzzle pieces-5

Paste in the 4 circles, so there are 8 shapes on the slide again.

puzzle pieces-6

Select all 8 shapes and use the Merge Shapes tool to unite the circles to adjacent squares to create the 4 puzzle pieces.

puzzle pieces-7

Each puzzle piece is a separate PowerPoint shape.

puzzle pieces-2

Each puzzle piece is a separate PowerPoint shape that can be resized, animated and recolored directly in PowerPoint.

puzzle pieces-9


Download a slide with the 4 puzzle pieces: PowerPoint_Puzzle_Pieces


– Troy @ TLC


By |2016-08-10T09:20:05-07:00November 6th, 2014|Resource/Misc, Tutorial|

Spell Check and ALL CAPS

In PowerPoint 2013, the default settings can limit some of Microsoft’s helpful features. With the default settings if you type a word in lower case, spell check automatically lets us know if there is a typo. But if you type the same word in all caps, spell check is not used. Here is my example, which according to Microsoft Office only has 1 misspelled:

AllCaps-1

The setting to change is to go to FILE >> OPTIONS >> PROOFING tab

AllCaps-2

In the WHEN CORRECTING SPELLING IN MICROSOFT OFFICE PROGRAMS section, uncheck IGNORE WORDS IN UPPERCASE

AllCaps-3

Now All Caps or Lower Case words are par of the spell check feature.

AllCaps-4

– Troy @ TLC

By |2016-08-10T09:24:08-07:00October 13th, 2014|Tutorial|

Distorted Images – How To Fix Through the Ribbon

As another option to correcting images that have been stretched and distorted, the Reset Image options are available on the Ribbon. This is usually quicker way to accomplish the same thing detailed in last blog post.

Here is my stretched and distorted sample image.

distorted-7

To reset the image:

1. Select the image.

2. Go to the FORMAT tab, PICTURE STYLES section, and the RESET PICTURE drop down.

distorted-10

3. Click the triangle on the RESET PICTURE option.

distorted-11

4. RESET PICTURE will remove any styling, such as drop shadow, bevel, border, etc.

5. RESET PICTURE & SIZE removes any styling and reverts the image to the inserted size.

Using RESET PICTURE & SIZE the stretched TLC logo is returned to its correct aspect ratio and is no longer distorted.

distorted-12


– Troy @ TLC

By |2016-08-10T09:27:39-07:00September 24th, 2014|Tutorial|

Distorted Images – How to Fix

There has been an increase in requests for help with distorted images. I believe a big reason is the shift from 4×3 to 16×9, and images becoming stretched when the page setup is changed.


Here is the TLC image that has been inserted onto a 4×3 slide.

distorted-1


When I change the page setup from 4×3 to 16×9, images distort and the TLC logo looks like this:

distorted-7


Note: With PowerPoint 2013, there are some really great aspect ratio conversion options built in, and for PPT 2007/2010 users, there are some very helpful 3rd party add-ins that make the aspect ratio conversion much easier. All are created to help you from starting on the left and getting the image on the right:

distorted-8


To restore any inserted image to its original aspect ratio:

1. Right-click the image and select FORMAT PICTURE


distorted-3

2. From the Format Picture Dialog, go to the SIZE AND PROPERTIES tab

distorted-9


3. Click the RESET button

distorted-6


The image will reset to the original inserted size (which also means all effects – shadow, bevel, brightness are removed). Resize the image to fit the slide content area for images that look proportionally correct!


– Troy @ TLC

By |2016-08-10T09:28:32-07:00September 22nd, 2014|Tutorial|

Is That Straight Line Really Straight…?

The snap-to-grid, Align to anchor point and random placement of PowerPoint lines can, at times, become frustrating. When reviewing a slide layout, I am often looking at lines and trying to determine if they are straight. For example, after looking at this simple layout, I question whether the line connecting the two boxes is straight or just an optical illusion.

Straight_1


When we zoom in and add a guideline to see what is straight – the connecting line is very slightly off. Not a big deal when viewed as a small image here on the blog. But enlarge this diagram to fit a 40′ wide screen and this small inaccuracy is big!

Straight_2


One of my go to PowerPoint add-in sets is from ToolsToo.

Straight_5

These two tools are in the SHAPE TOOLS section: MAKE LINE HORIZONTAL and MAKE LINE VERTICAL.

Straight_3


Two clicks and I know a line is straight. Select the line, click the horizontal or vertical button and no matter what the line is snapping to, it is set to a straight line on the 0 or 90 degree axis!

Straight_4


– Troy @ TLC


By |2016-08-10T09:34:49-07:00September 10th, 2014|Tutorial|

Mockup Everything for Presentation Images

Mockup Everything is a web-based application that lets us quickly create custom graphics with images embedded in iPads, t-shirts, iPhones, magazine covers and many other objects.
Mockup everything 19

TLC staff designer, Michelle, spent some time working with Mockup Everything’s website and wrote up this great overview tutorial on using it.

1. To get started, click on SELECT A TEMPLATE on the homepage to choose one of the free templates to work with.

Mockup everything 1

2. For this tutorial, I selected the IPAD – ANGLED template to place our design on.
Mockup everything 2

3. Hover over the image of the iPad until you see a blue area highlighted, then click the blue highlighted area to open the import image dialog.
Mockup everything 3

4. Select the image from your computer that you want to place on the template, and click Open.
Mockup everything 4

5. Verify that you have selected the correct image by clicking SAVE (or select UPLOAD NEW ART to change the image), and the image will be placed on the template.
Mockup everything 5 Mockup everything_6

6. My image is not the exact size of the template’s area for the ipad screen, so I am changing the background color behind the image. Select the small square on the left, and choose a color, there are options to use a preset color or an eyedropper tool.
Mockup everything 7 Mockup everything 8

7. Now, I want to change the background image of the template itself by clicking on the other small box, and I will use white as our background.
Mockup everything_10 Mockup everything 11 Mockup everything 12


8. To save the custom image, click SAVE IMAGE. If you are using the free version of Mockup Everything, there are options to upgrade for a higher quality resolution and size image. For now, I am just clicking No thanks, let me download the low res image to save the image at a resolution of 72 ppi and a size of 750 x 422 pixels, which is good for most presentation design needs.
Mockup everything 13


9. Once saved, I have an image like the one below ready to insert into PowerPoint.
Mockup everything 14


10. There are some great options in the free templates options on Mockup Everything.
Mockup everything 16 Mockup everything 15 Mockup everything 17


11. The PRO version of Mockup Everything is $12 per month and has many more objects, angles and options such as: men’s, women’s, baby and youth apparel, books, magazines, posters, envelopes, business cards, bags, boxes, vinyl records, CD cases, and much more. There are even templates for skateboards, snowboards, different technological devices, outdoor scenes (such as billboards and buses), and beverage containers.

Mockup everything 18


– Michelle @ TLC

By |2016-08-10T09:35:08-07:00September 8th, 2014|Tutorial|

Using PowerPoint’s Shape Merge (3)

Part 3 of the Shape Merge real-world, presentation design examples is a Key shape.

BATTERY
Goal is to create a single PowerPoint shape of a classic battery that can be stylized in any way using Point’s features.

Shape(s) 1 – two rounded corner rectangles to create the battery shape.

Shape 2 – the power/lighting shape is a standard shape in PowerPoint. Rotate, size a position on battery shape (color does not matter – we are going to delete it in the next step).

Shape 3 – select the battery shape, then the lightning bolt shape, use the Shape Merge SUBTRACT. Note: PowerPoint does some interesting things, in this example, the final shape is created visually in the correct orientation, but is actually rotated 326′.

– Troy @ TLC

By |2016-08-10T09:39:02-07:00May 28th, 2014|Tutorial|

Using PowerPoint’s Shape Merge (2)

Part of the Shape Merge real-world, presentation design examples is a Key shape.

KEY
Goal is to create a single PowerPoint shape that can be stylized with different fill colors for an analogy slide of the 3 corporate program “keys.”

Shape(s) 1 – design the key using a circle and set of rectangles.

Select all shapes and use the UNION tool to create a single shape.

Create a new circle, size and position over the handle part of the key.

Select the key 1st, then the circle and use the SUBTRACT tool to create the final, single shape Key (shadow added, fill changed).

– Troy @ TLC

By |2016-08-10T09:39:19-07:00May 26th, 2014|Tutorial|

Using PowerPoint’s Shape Merge (1)

Christie was tasked with creating a 3-part blog series of creative, real-world, presentation design examples using PowerPoint’s Shape Merge tools (see this post on the Shape Merge Tools).

TARGET
Goal is to create a single PowerPoint shape with the concentric circles of a classic bullseye target. Note: With the Shape Merge tools, the first selected shape will make a difference in which item will be removed.

Shape 1

Shape styling – gradient fill:

Shape(s) 2: series of 4 circles with thick outlines (color does not matter).

Move Shape 1 (red circle) under Shape 2 and align all:

Select shapes (this is important – select Red circle 1st) and the Shape Merge COMBINE tool:

Final touches – bevel, gradient fill, shadow or any other effect styling can be applied to this new SINGLE SHAPE (I added the gradient fill in the original shape, but added a drop shadow after):

– Troy @ TLC

By |2016-08-10T09:40:53-07:00May 23rd, 2014|Tutorial|
Go to Top