shapes

Pictures In Autoshapes

One of the creative things possible in earlier versions was to fill an autoshape (circle, rectangle, triangle, etc.) with an image. This required:
– creating the autoshape
– go through 4-7 steps to fill shape with the photo

But now things are MUCH EASIER!
– Insert photo
– With photo selected choose any autoshape
– Done!

In less than 1 minute all of these custom images were created:

– Troy @ TLC

By |2016-11-17T13:46:21-07:00December 26th, 2007|Tutorial|

Designer Look for Tables (2)

To add the rounded corners to the table I just cheated a bit…

First I set the upper-left and lower-right cells to no fill (note the text in the upper-left is now the same color as the background and cannot be seen).

Second I created two rounded corner autoshapes. Each filled with same color as the table background and sent to back. I then positioned them to align with the edges of the table.

Finally I grouped all three elements so they could easily be moved. The final result is a table with two rounded corners.

– Troy @ TLC

By |2016-11-17T16:09:44-07:00June 28th, 2007|Portfolio|

PPT Overlays To Graphics (3)

Because the globe is an animated .gif, not a Flash or movie file we are able to overlay elements (Flash and all movie formats always play on top of all PowerPoint content). The green semi-transparent circle overlay is the first layer. The next layer was each division logo – in this case I have added the TLC Creative logo.

The Problem here is that the logo is a bit flat and the black text is lost. Again, the solution was using a PPT autoshape. This time I created a glow, which was simply a white circle with a custom fill from center. Here is one done in blue (so it can be seen on this white background).

The result is a nice highlight spot that not only makes the logo text legible, but adds a 3D element to the overall globe.

– Troy @ TLC

By |2016-11-17T16:06:35-07:00June 16th, 2007|Tutorial|

PPT Overlays To Graphics (2)

Because the globe is a circle, the solution to making it tie in with the template color scheme was to use a semi-transparent autoshape. I added a circle, sized it to the globe, then gave it a subtle 2-color fill.

This altered the “blue” globe to a “green” globe – without affecting the animated .gif

– Troy @ TLC

By |2016-11-17T16:05:20-07:00June 10th, 2007|Tutorial|

PPT Autoshape BG (4)

Using another gradient autoshape I created the title text area.

By having the more transparent area over the already darker right corner another sense of depth is created.

– Troy @ TLC

By |2016-11-17T16:02:47-07:00May 29th, 2007|Tutorial|

PPT Autoshape BG (5)

Depth creates shadows. So adding a drop shadow is an easy way to add depth to this background. Using a very thin gradient autoshape is all that was needed.

Here are the FILL EFFECTS settings to create the drop shadow (note I am using black, but not starting with a solid color, 40%, to create a “dark grey” that mixes with the other colors).

– Troy @ TLC

By |2016-11-17T16:02:23-07:00May 29th, 2007|Tutorial|

3D Spheres from AutoShapes

I create a lot of graphic elements for presentations and since the inception of PPT XP I have been able to do many directly in PowerPoint with some creative use of AutoShapes and transparency settings. PPT MVP Shawn Toh has posted a sample presentation with some really great 3D spheres at Indezine.

Here is one of the spheres created entirely with autoshapes:
One of the 3D Spheres in the Presentation
Here are the autshapes used to create the above 3D spere:
Autoshapes used to create the 3D Sphere

Here is the description and download link on Indezine, click here.

Troy @ TLC

By |2016-11-17T14:05:00-07:00July 8th, 2006|Resource/Misc, Tutorial|

Animation with AutoShapes Gone Wild!

I have had this file from fellow PPT MVP “Tohlz” for a while and just got around to viewing it. Wow!

The content is nifty, the animations great, but what really impressed me was that the entire presentation/movie is made from a complex use of PowerPoint autoshapes! This includes the 3D effects, the highlights, everything. I would develop this using a couple dozen PhotoShop created .png images and call it a day, but making them all with autoshapes creates a small file size and shows lots of creative thinking!

Made Only With PPT Autoshapes
View it out at the “Evolution Warriors” here.

– Troy @ TLC

By |2016-11-17T14:01:44-07:00June 24th, 2006|PowerPoint|

Circle and Triangle Shadow Boxes

The Shadow Box concept is not constrained to rectangles. I use variations of Shadow Boxes in every conceivable way, always with the goal of adding depth and visual dynamics to the slides. Here are two samples I created that use a circle and triangle.

Circle Shadow Box Applied
Here I duplicated the circle, removed the outline/stroke and went into the Fill Effects exactly the same as described in the previous post. But here I am using a color for the center and I manually distorted the circle to give it the cast shadow effect.

Pyramid Shadow Box
Here I duplicated the Pyramid, removed the outline/stroke and went into the fill effects. The difference is that I set the Shading Styles to be Horizontal so the gradient went from the top of the image to nothing at the bottom. I then really distorted the autoshape (extending it far beyond the boundary of the viewable slide) and positioned to create the drop shadow effect.

Troy @ TLC

By |2016-09-16T11:45:17-07:00April 22nd, 2006|Tutorial|

Create Shadow Boxes

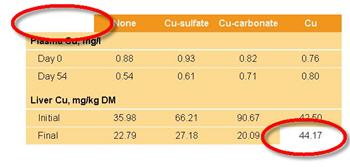
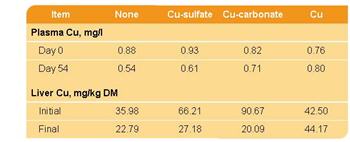
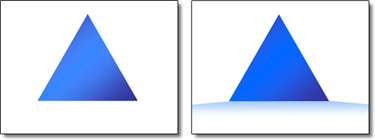
A simple shadow element can add depth and eliminate some of the flat look and feel of a slide. In the last post I added a simple shadow box to a list box and a chart, here is how to create the shadow box – using PowerPoint autoshapes.

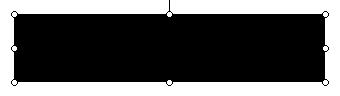
First create a rectangle. Set the fill to black and no outline/stroke.
PowerPoint rectangle autoshape

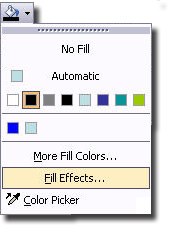
With the rectangle selected go to the Fill Effects.
Fill Effects

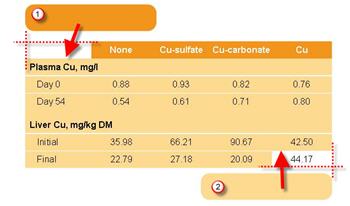
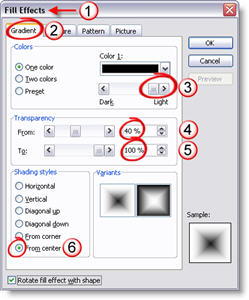
(1) In the Fill Effects window
(2) Go to the Gradient tab
(3) Move the slider all the way to the right/lighter
(4) Adjust the From opacity to 40%
(5) The To opacity should be at 100% (set when we moved the slider in #3)
(6) In the Shading Styles select From Center
Fill Effects Settings

Your rectangle will now look like this:
Smooth Gradient Filled Rectangle

The best thing about this rectangle is that it is a native PowerPoint autoshape. It can be adjusted as large or small as needed without any distortion or loss of quality. In addition you can go back into the Fill Effects and change the color and the inner opacity to best suite your slide!

Troy @ TLC

By |2016-09-16T11:44:50-07:00April 20th, 2006|Tutorial|
Go to Top