resize

How to Prevent Resize Slide From Erasing Formatting (part 3)

The solution we use at TLC Creative Services is to remove the variant. The simple answer is to save the presentation as a PowerPoint template (.potx) which creates a file with no variants. Here is a quick step-by-step process:

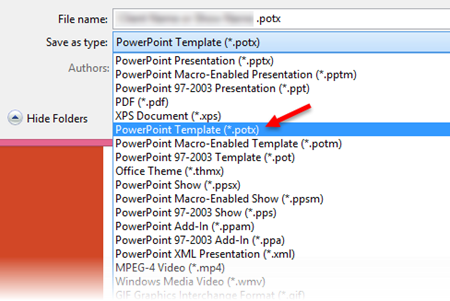
1. Go to File>> Save As >> POTX from drop down list

  • Save to the desktop (this is a temporary file you will delete)
  • Use a file name that is applicable to the template
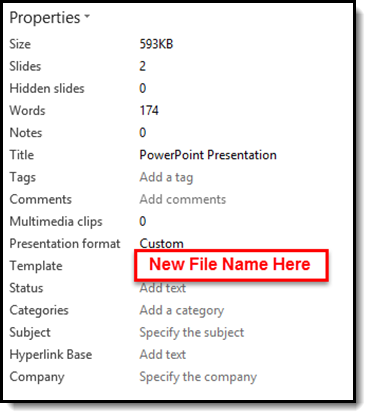
  • Note 1: The file name will be seen in the file properties
  • Note 2: A .potx is a PowerPoint template and it cannot contain slides, so doing this is going to DELETE all slides (which will be added back in a few steps)

SlideResize-8

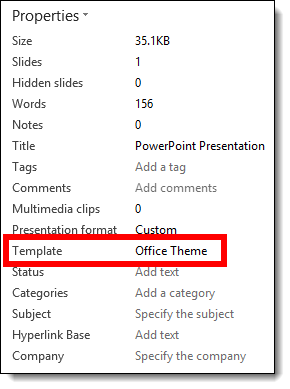
2. Open the new .potx file and look at the file properties

  • Creating a .POTX removes the Default Theme ID
  • The TEMPLATE property will now list the .POTX file name
  • Note: When you open a .potx, it automatically creates a .pptx presentation file.

SlideResize-12

3. Go to FILE > SAVE AS > POWERPOINT PRESENTATION (.pptx) from the drop down list

  • Opening a .potx automatically creates a .pptx presentation file
  • Open file is most likely named “Presentation1.pptx”
  • Save presentation with a new file name – Best Practice: Name same as original file name + version # (eg. _v2)

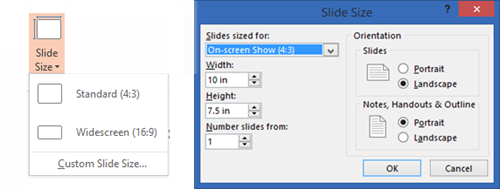
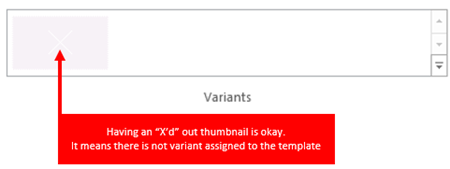
4. Go to DESIGN tab > VARIANTS section

  • The presentation now has no VARIANTS

SlideResize-13

7. Add slides from original presentation to the new, no variant, presentation and save file

8. Delete the temporary .potx and the original presentation

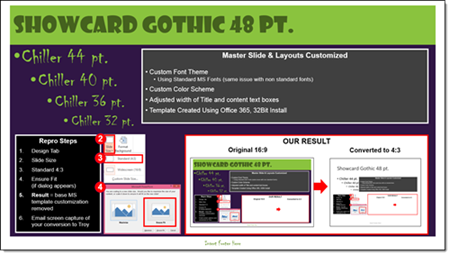
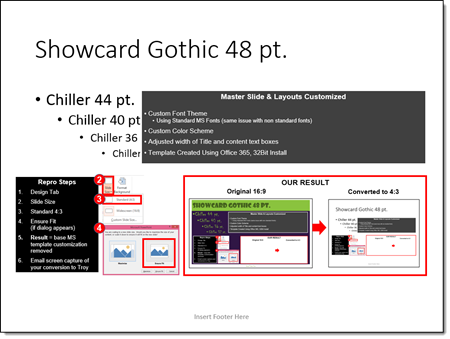
9. Use the Resize option without losing template formatting!


– Troy @ TLC

By |2016-08-10T09:00:17-07:00August 19th, 2015|Tutorial|

Why Resize Slide Erases All Formatting (part 2)

The previous post showed how template formatting is often stripped out of a presentation when it is resized.

SlideResize-1      SlideResize-9

So here is my simple, non-tech description of what is happening inside PowerPoint (Note: If you really want details on templates and themes, I highly recommend Echo Swinford and Julie Terberg’s excellent book: Building PowerPoint Templates Step by Step with the Experts).

The resize “bug by design” will only happen with presentations and templates developed in PowerPoint 2013 and above.  Files created in PPT 2007 and 2010, even if edited in 2013, do not have the resize issue because those versions of PowerPoint do not have the troublemaking feature. With PowerPoint 2013, a new option for templates was added, VARIANTS. Variants will eventually be a great feature, but currently they are not really used and the “Super Theme Templates” they open the door to create are so difficult to develop, I only know a few designers in the world who really understand them and are willing to tackle them (and I am not one of them).

Variants, which you see in the Ribbon on the Design Tab, are basically template styling options.

SlideResize-5

When resizing slides, PowerPoint needs to use a variant. If there is not a custom variant already there from a Theme, PowerPoint reapplies the Microsoft Default Theme. The default theme, called “Office Theme,” is what you get when opening a new blank presentation (boring, white, no stylized formatting).

SlideResize-10

When the default theme, and its variants, are applied, all formatting to the master slide and layouts are replaced with this “default” setup. What this means is nicely designed slides lose their existing template styling attributes. See the previous post for a downloadable sample slide you can test and see formatting stripped.

Here are 2 ways I do a quick check to see if a provided file is going to have an issue if it needs to be resized:

1. Go to FILE > PROPERTIES > expand to see all properties > TEMPLATE

– If the TEMPLATE property is BLANK or has “OFFICE THEME,” I know it is almost 100% certain to have formatting issues if resized

SlideResize-6

2. Or I look at the DESGIN tab >> VARIANTS section and see what variants are available (Note: If there are no variant thumbnails, that is covered in part 3, and it is okay)

SlideResize-11

The next post, part 3, is a step-by-step solution to avoid PowerPoint adversely affecting slides when resized.

– Troy @ TLC

By |2016-06-16T14:07:02-07:00August 17th, 2015|Tutorial|

Resize Slide Erases All Formatting! (part 1)

Here is the scenario: you have a 16×9 presentation that needs to be changed to 4×3. Easy! PowerPoint has a great feature to change the aspect ratio (via Page Setup) and it keeps everything proportional (eg. circles stay round) and adjusts the position of everything to fit the new slide layout – but things don’t go as smoothly as planned.

1. Here is your 16×9 slide (download this PowerPoint 2013 Resize Test Slide):

SlideResize-1

2. Go to DESIGN > SLIDE SIZE > STANDARD 4×3

Resize14

3. Here is the disaster you get when converting to 4×3

SlideResize-9

Note: This problem is not the size selected (4×3), it happens when going from any size to another size. And this is not a bug, but by design (I really like how Echo Swinford  describes this as “a bug by design”). What you end up with is:

– Correct page size – yay!

– Custom background – gone

– Custom fonts – gone

– Custom color scheme – gone

– Any template customization – gone

Part 2 and 3 of this series detail what is happening behind the scenes in PowerPoint and a (fairly) simple step-by-step solution.


– Troy @ TLC

By |2016-06-16T14:09:24-07:00August 14th, 2015|Tutorial|

Using Pic Resize to Optimize Images for PowerPoint

Pic Resize is a useful web-based app to optimize images for presentations, that is FREE. Images can be resized, cropped and have many editing options applied. This is a good, quick solution in the process of making images sized for a presentation and not jumbo multi-megabyte sized files from a digital camera or print project. TLC designer, Michelle, put together this overview of how Pic Resize is used and some of its options.

To get started, go to the Pic Resize webpage (here).

Click From Computer and then the Browse button. Locate a image on your computer and click Open.

Pic ReSize-1

Pic ReSize-2

Once you have selected the image, click the Continue (Resize, Crop & Special Effects) button.

Pic ReSize-3

On the top portion of the next page, you can crop or rotate your image, if needed. Continue on to the second section to resize your image. The website defaults to resizing the image to 50% of the original size. If you need a different size, click on the drop down menu and select another preset percentage or resolution. You can also select Custom Size… to enter in the dimensions of your choice.

Pic ReSize-4

To optimize this image for use within PowerPoint, I will resize this image to 800 pixels wide. By leaving the Height field empty, Pic Resize will automatically keep the image proportionate by determining the correct height value.  You can also select a custom percentage of the original image by selecting Percent from the drop down image next to the Width or Height fields. The new dimensions of the image can be found on the right next to Estimated Final, which will be highlighted in green.

Pic ReSize-5

In the next section, you can select one of many special effects to enhance the image, if desired. Some of these special effects include Oil Paint, Scorched, Grayscale, and Sharpen, which can be seen below.

Pic ReSize-6

Pic reSize-7


In the last step, you will select the format, quality (if JPEG) and maximum file size (optional) to save your image as. The original format of the image will be automatically populated but JPEG, GIF, PNG, and BMP are all supported. PNG images with alpha transparency are supported, so transparency will be maintained if resized. If resizing to a JPG as the format, you can also select the quality of the image being saved.

Pic ReSize-8

Once you have selected the format and quality, click the I’m Done, Resize My Picture! button. When successfully resized, you can select View Image to preview, Resume Edit to continue editing, Save to Disk to save onto your computer, or Save to Web to upload the image onto a social media website of your choice. For this instance, we would save the image to the desired location by clicking Save to Disk.

Pic ReSize-9

Once saved, you now have an optimized version of your image that can be easily used within PowerPoint. Below, you can see the new, optimized image, which was resized from 5184 x 3456 pixels down to 800 x 533 pixels.

– Michelle @ TLC

By |2016-08-10T09:23:22-07:00October 20th, 2014|Software/Add-Ins|

Using Pic Resize to Optimize Images for PowerPoint

Pic Resize is a very useful tool to resize and edit images that are larger than needed. This website offers a quick and easy-to-use method to optimize a large image so that it fits your needs.

To get started, make sure you have selected From Computer to choose an image on your computer to resize. Click Browse to locate the image on your computer, select the image desired and click Open.

Once you have selected the image, click the Continue (Resize, Crop & Special Effects) button.

On the top portion of the next page, you can crop or rotate your image, if needed. Continue on to the second section to resize your image. The website defaults to resizing the image to 50% of the original size. If you need a different size, click on the drop down menu and select another preset percentage or resolution. You can also select Custom Size… to enter in the dimensions of your choice.

To optimize this image for use within PowerPoint, I will resize this image to 800 pixels wide. By leaving the Height field empty, Pic Resize will automatically keep the image proportionate by determining the correct height value. You can also select a custom percentage of the original image by selecting Percent from the drop down image next to the Width or Height fields. The new dimensions of the image can be found on the right next to Estimated Final, which will be highlighted in green.

In the next section, you can select one of many special effects to enhance the image, if desired. Some of these special effects include Oil Paint, Scorched, Grayscale, and Sharpen, which can be seen below.

In the last step, you will select the format, quality (if JPEG) and maximum file size (optional) to save your image as. The original format of the image will be automatically populated but JPEG, GIF, PNG, and BMP are all supported. PNG images with alpha transparency are supported, so transparency will be maintained if resized. If resizing to a JPG as the format, you can also select the quality of the image being saved.

Once you have selected the format and quality, click the I’m Done, Resize My Picture! button. When successfully resized, you can select View Image to preview, Resume Edit to continue editing, Save to Disk to save onto your computer, or Save to Web to upload the image onto a social media website of your choice. For this instance, we would save the image to the desired location by clicking Save to Disk.

Once saved, you now have an optimized version of your image that can be easily used within PowerPoint. Below, you can see the new, optimized image, which was resized from 5184 x 3456 pixels down to 800 x 533 pixels.

– Troy @ TLC

By |2016-08-10T09:41:20-07:00May 21st, 2014|Software/Add-Ins, Tutorial|

Resize Preview To Fit-to-Screen: PPT vs. Photoshop

To quickly get the “big picture” you may need to see the whole slide or image. There are some great keyboard shortcuts to do this, but they are different in PPT 2003, PPT 2007 and Photoshop.

PowerPoint 2003:
Option 1: Use the drop-down menu and choose FIT

Option 2: Install the PPTools free StarterSet and click the magnifying glass icon

PowerPoint 2007
Click the ‘Fit to Window’ button in the lower right corner

Photoshop:
CTRL + 0 (zero)

– Troy @ TLC

By |2016-09-16T11:09:46-07:00January 27th, 2009|Tutorial|

Resize and Keep Aspect Ratio: PPT vs. Photoshop

Another great feature is resizing (enlarging or shrinking) images and autoshapes from any corner and have it maintain the same aspect ratio.

This feature is available in PowerPoint and Photoshop, using the SAME key combination.

PowerPoint: SHIFT + adjust with mouse

Photoshop: SHIFT + adjust with mouse

– Troy @ TLC

By |2016-09-16T11:10:07-07:00January 25th, 2009|Tutorial|

Resize From Center: PPT vs. Photoshop

A great feature is resizing (enlarging or shrinking) images and autoshapes from their center point.

This feature is available in PowerPoint and Photoshop, but using different key combinations.

PowerPoint: CTRL + SHIFT + adjust with mouse

Photoshop: CTRL + ALT + adjust with mouse

– Troy @ TLC

By |2016-09-16T11:10:30-07:00January 23rd, 2009|Tutorial|

I Don’t Want Black Letterbox Bars!

So the display monitor for your presentation is not a “standard” resolution and you want don’t want to have black letterbox bars while your presentation is shown. The best option is to adjust the page size of the presentation to a height and width that matches the display size. But what do you adjust the page size too?

If you want to avoid the higher math needed, you can use a free little application created by Austin Myers over at Plays For Certain. The “Calculate PowerPoint Slide Size” does exactly what it says. Input the pixel size of the display, click the calculate button, and it does all the math for you, providing 3 page setup options that guarantee the presentation will fill every one of those pixels.

Just click here to download (11K .zip).

– Troy @ TLC

By |2016-11-17T13:26:32-07:00February 18th, 2008|PowerPoint, Software/Add-Ins|

Image Resizer

This free application from Microsoft has some great uses. Basically it does exactly what the name implies, it adds the ability to resize images. But this one is accessible from a right-click on any image.

It is a limited use application, in that it offers only four preset image sizes. If you click the ‘Advanced’ button it also offers the ability to set a custom size. Another nice feature is you can select multiple image files and convert all to a new size as a batch process.

You can get more info and download from here.

– Troy @ TLC

By |2016-11-17T16:28:35-07:00October 3rd, 2007|Software/Add-Ins|
Go to Top