powerpoint

Double-Click Launches WRONG Version of PPT

If you have multiple version of PowerPoint installed on your computer, you most likely just experienced this issue (or you are about to). The latest round of updates & patches for Office reset the registry entry for Office, so it reverts to Office 2000 (if installed). What this means is that the quick-launch, when you double click an icon, opens the document in Office 2000. Kind of frustrating, but here is the fairly quick and easy solution:

(1) Close PowerPoint.

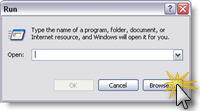
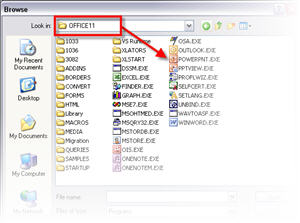
(2) Go to START >> RUN >> BROWSE

(3) Go to MY COMPUTER >> C: >> MY PROGRAMS and open the most current version of Office (the one you want quick launches to open)

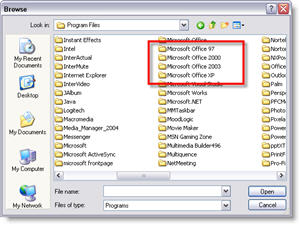
(4) Inside the Office Folder locate the PowerPoint .exe file (careful NOT to select the PowerPoint Viewer) and click okay.

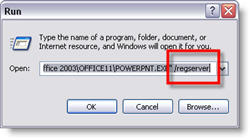
(5) The Run menu has automatically added the path to PowerPoint, at the end of this information (outside the quote mark) add /REGSERVER

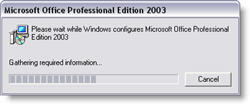
(6) You will get an INSTALL, then a CONFIGURE dialog. When it is done, you are back to the quick launch doing what you expect 🙂

– Troy @ TLC

By |2016-11-17T14:00:08-07:00June 17th, 2006|Tutorial|

Zoom In on the Advanced Animation Timeline

I know I have covered this as part of other tutorials, but here a quick recap of this highly useful trick.

Here is the situation: you want to create a “waterfall” animation for your text (where each line fades in, overlapping the previous fade in animation). You apply the animation, view timeline in Advanced view and go to slide each animation bar but get frustrated with it jumping around…

Try this: click on the word “SECONDS” at the bottom. Choose “ZOOM IN” and do this 2-3x’s. Now the animation pane has been zoomed in and the animation bars are much wider – making it easier to slide them precisely where you want!

– Troy @ TLC

By |2016-11-17T13:49:08-07:00June 11th, 2006|Tutorial|

Animation Sample – Move and Grow

This is a quick animation sample that I created based on yesterday’s posted tutorial. Here I start with a small image and combine a MOTION PATH with a GROW EMPHASIS and finally a fully size image FADE IN. The result is some visually dynamic onscreen action, that overcomes one of PowerPoint’s raster graphic limitations.

Click here to download the PowerPoint file (500k).

-Troy @ TLC

By |2016-11-17T13:50:27-07:00June 5th, 2006|Portfolio, Tutorial|

Grow-Shrink Animation – Part II

This is a continuation of the Part I post on May 22. In this tutorial PowerPoint presentation I make a photo shrink and then grow back to its 100%, without any resolution loss. Okay, so it is a tutorial on how to use animation to fake it, but the results are great and it is a technique I use on many projects.

Click here to download the PowerPoint file (900k). The entire animation sequence is broken down into individual steps over 10 slides.

And there is a forthcoming part three, which is another technique for making an image grow, without resolution loss.

– Troy @ TLC

By |2016-11-17T13:51:10-07:00June 3rd, 2006|Tutorial|

Enlarge an Image (Part 1)

There are some great animation effects that can be achieved using the “Emphasis” animations. One of the more frustrating is the Grow/Shrink emphasis. I have a developed a two part tutorial to go into details on how best to use this animation effect. Download Part I here (1 MB PPT file).

Troy @ TLC

By |2016-11-17T13:53:41-07:00May 22nd, 2006|Tutorial|

Animation Sample (Airport Security Analogy)

Here is a presentation that is a series of animated slides from a project where the speaker needed to explain the company’s medical process to a non-medical audience. We decided on developing an analogy of the various industry processes with something everyone is familiar with – airport security.

As is typical for many of the presentations I work on, it is primarily 90% custom PhotoShop elements animated in PowerPoint. Download the presentation for review and inspiration. I have left it as an editable presentation for those that want to look at the animation timeline and techniques can do so. Click here to download (4.5 MB ).

Troy @ TLC

By |2016-11-17T13:56:02-07:00May 14th, 2006|Portfolio|

Make Your Own Custom Bullet Collection

Perhaps you have some custom picture bullets that you use ongoing. Never fear, there is a fairly easy way to organize your own collection.

(1) Either create your own folder to contain the bullet images or use the Office default folder (see item #1 on 5-8-06 post).

(2) Copy picture bullet images into folder

(3) Open the Clip Organizer (see item 3 on the 5-6-06 post) and go to FILE >> NEW COLLECTION.

(4) Name the collection and click okay.

(5) Select the new collection in the COLLECTION LIST column. Go to FILE >> CLIPS TO ORGANIZER >> ON MY OWN.

(6) Repeat for all images in your personalized collection. Note: You can use the >> CLIPS TO ORGANIZER >> AUTOMATICALLY to search the computer, then select the specific folder to add all new images at one time.

(7) Now when you add Custom Picture Bullets to any presentation, your collection of bullets is available!

-Troy @ TLC

By |2016-11-17T13:57:15-07:00May 10th, 2006|Tutorial|

Remove Default Picture Bullets

So, maybe like me you find some of the default picture bullets one you will not use… So here is where to go and find the hidden files to remove them.

(1) The first step is to open Windows Explorer and navigate to the folder that contains the images. Go to C: >> PROGRAM FILES >> MICROSOFT 2003 (or current installed version) >> MEDIA >> OFFICE 11 >> BULLETS (I said the files were hidden).

(2) Now we need to go to the Clip Art Organizer (see May 6 post). In the Clip Organizer go to OFFICE COLLECTIONS >> WEB ELEMENTS >> BULLETS. You will note that any of the default bullets you deleted in step #1 has the yellow, no link, “x”.

(3) You can remove the non-linked icons as described in the May 6 post.

– Troy @ TLC

By |2016-11-17T13:57:53-07:00May 8th, 2006|Tutorial|

Removing Unused Custom Bullet Icons

For virtually every PowerPoint template I design, it includes a custom set of picture bullets. Up until recently I was frustrated with having the old icons still sitting in the Custom Picture Bullets dialog when they no longer existed on my computer. But there is a solution – although it is a bit hidden. Here is how to clean up your PICTURE BULLETS dialog and remove the old and unused!!!

(1) Let’s review how we insert a custom picture bullet. With bulleted text selected, go to FORMAT >> BULLETS AND NUMBERING. On the BULLETED tab click the PICTURE button.

(2) Here you can see a small portion of the custom bullets that were used for previous presentations. The problem is, the source files for these are in the archives, not on the computer. They are completely useless here. Of course the little yellow X seems to be a way to delete them… but it is not. The yellow X tells you there is no item linked to this icon (which is why we want to delete it 🙂 )

(3) To remove these icons go to the Clip Art task pane; INSERT >> PICTURE >> CLIP ART. Click the ORGANIZE CLIPS link at the bottom.

(4) Inside the Microsoft Clip Organizer you need to:
1. Click COLLECTION LIST to view the pane
2. Open MY COLLECTIONS and UNCLASSIFIED CLIPS
3. Click on the unwanted icon
4. Select DELETE from the menu
5. Done! (repeat for as many as needed)

– Troy @ TLC

By |2016-11-17T13:58:24-07:00May 6th, 2006|Tutorial|

Add Custom Bullets to a Presentation

Now that we have developed our custom picture bullet in PhotoShop, we can insert them into a PowerPoint presentation. The process is fairly simple (Note: I am using PowerPoint 2003 for this tutorial).

(1) Select the bulleted text. Go to FORMAT >> BULLETS AND NUMBERING.

(2) From the BULLETS AND NUMBERING dialog click PICTURE.

(3) From the PICTURE BULLET dialog click IMPORT.

(4) Note the next dialog box is the ADD CLIPS TO ORGANIZOR dialog (import later in this series). From here find the .png image created and click ADD.

(5) Find the newly added picture bullet in the PICTURE BULLET dialog and click OK.

(6) Your selected bulleted text now has a COOL and NIFTY custom bullet!

(7) If the bullet is to large or small, select the bulleted text, go to FORMAT >> BULLETS AND NUMBERING, and use the SIZE % OF TEXT to adjust.

– Troy @ TLC

By |2016-09-16T11:51:43-07:00May 4th, 2006|Tutorial|
Go to Top