powerpoint

Free Picture Finder

Free Picture Finder is a PowerPoint, and Word, add-in that searches for royalty free pictures on Flickr. To install, open PowerPoint, go to INSERT > STORE > search for “Free Picture Finder” > click ADD.

It’s simple to use. After installed, go to INSERT > MY ADD-INS > click the drop down menu and click on FREE PICTURE FINDER. The app action pane will open on the right. Just type a keyword in the search bar and images will populate. Click any thumbnail image and it is automatically placed on the current slide.

Free Picture Finder 3

The images are all royalty free and can be used however you’d like, but the only caveat is that the image size is capped at 250px in height or width. Here is a sample layout of images added and then PowerPoint styling applied:

Free Picture Finder 4

By |2018-07-02T17:54:48-07:00July 9th, 2018|Resource/Misc|

Change Shape of a Video

Earlier this month, was how to use PowerPoint’s Change Shape tool. Using the same tool, videos are not limited to rectangles! Essentially the Change Shape for videos crops any video to a new shape.  

First, insert your video and select it.

Change Shape on Video 1

Go to Video Tools > Format Tab, click Video Shape > Oval (or other desired shape).

Change Shape on Video 2

The video is now cropped to an Oval.

Change Shape on Video 3

The same crop tool functionality used on images works on videos. By default, the Video Shape tool crops to the existing rectangle aspect ratio. To make the video playback a perfect circle, use the crop tool to manually change the aspect ratio to 1:1. 

Note: adjust the viewable area of the video by repositioning the video in the cropped area while the crop tool is selected.

Change Shape on Video 4

The video is now a circle, or a star, a heart, or any other shape in the Video Shape library!

Change Shape on Video 5

Whichever shape you select, the video will export and play in that format.

Troy @ TLC

By |2018-06-10T07:51:05-07:00June 29th, 2018|Tutorial|

Making Text Align to the Edge of the Text Box

Text boxes in PowerPoint are like mini-word documents. Each one has its own margins, tabs and formatting.

The text box formatting options (margins, tabs, line spacing, etc.) for each text box can be modified in the Format Shape dialog. Select a text box > FORMAT > open the FORMAT SHAPE pane > TEXT OPTIONS > TEXT BOX. Or right-click any text box and select FORMAT TEXT EFFECTS > TEXT BOX.

Just one example of where modifying a text boxes internal margins can help the visual layout is when a design needs the text to flush align with other objects, vertically and/or horizontally, the text box margins interfere with the results.

For this example, it is making the 3 objects, 2 boxes and 1 text box, all with the ALIGN LEFT tool, vs. manually adjusting the position of the text box so the text inside it is visually aligned with the objects above it. 

The left edge of all three align, but visually the text is indented, but they are actually aligned to the left edge.

Instead of manually moving the text box left to visually align the text with the two boxes, adjust the text box margins – set the left margin to zero.

To illustrate, here is are two text boxes. They have identical formatting, but the lower one has a solid fill to show the text margin. The top text box has a zero left margin. The bottom text box has the default .1″ inset margin pushing the text away from the true left edge.

To make the text align to the left edge, go to the Format Tab and click on the small arrow under the text portion for the FORMAT SHAPE menu.

Select TEXT BOX in the left column and on the right in the INTERNAL MARGIN section change the LEFT to “O”.

The text now aligns flush to the left edge.

At TLC Creative we are constantly working with text box internal margin settings to create visual layouts. It is easier if each text box is visualized as a mini-Word document with it’s own settings.

Troy @ TLC


By |2018-06-25T08:06:11-07:00June 25th, 2018|Tutorial|

Turn Off Text Hyperlink Color

PowerPoint automatically creates clickable hyperlinks for any text that begins with “www.” as well as all email addresses. 
turn off text hyperlink 0

For presentations that are presented on screen, a clickable link is not needed (the audience is not receiving the slides) and can be a visual distraction. Like many things in PowerPoint there are multiple ways to make the unwanted color and underline go away. Here are 3 ways to turn off text hyperlink color or remove a hyperlink:

Option 1

  • Highlight the link
    turn off text hyperlink 1
  • On the ribbon, go to INSERT and in the LINKS section, choose HYPERLINK.
  • Tip: CTRL+K on your keyboard is a shortcut to the Edit Hyperlink menu

    turn off text hyperlink 2

  • Click the “Remove Link” button
    turn off text hyperlink 3

Option 2

  • Right click the hyperlink text and on the menu select REMOVE HYPERLINK

turn off text hyperlink 4

Option 3

    • This one is time sensitive. Immediately after the hyperlink text is entered (hyperlink text that automatically is configured as a hyperlink either starts with www. or has the email address formula with an @ symbol), the text changes to a hyperlink and there is an ‘AutoCorrect Options’ button.
      turn off text hyperlink 5
    • Click the button, and select UNDO HYPERLINK
      turn off text hyperlink 6

There, 3 solutions to removing unwanted hyperlink coding in PowerPoint (also works in Word and Excel)!

Troy @ TLC

By |2018-05-31T18:31:42-07:00June 15th, 2018|Tutorial|

Select Text with Keyboard Shortcut

Microsoft has some great text selection tools. Double click and the full word is selected. Three clicks and a paragraph is selected. Click and drag and the selection automatically jumps in full word intervals. What many presentation designers do not have is the keyboard equivalents to these text selection options – they are amazing for speeding up design time!

1. Select ALL text in a placeholder.

  • Click inside the text box, anywhere, and CTRL + A to select all (okay, most everyone knows this one)

select text 1

2. Select a paragraph

  • Click inside the text box, at the beginning of the paragraph, and CTRL + Shift + Down Arrow a full paragraph is highlighted.

select text 2

3. Select individual words 

  • Click inside the text box, at the beginning of word to select, and CTRL + Shift + Right Arrow to select that word.
  • Click Right Arrow again to select the next word – repeat to select as many words needed

select text 3

select text 4

Okay, now it’s time to go edit slides more efficiently!

Troy @ TLC


By |2018-06-09T10:08:37-07:00June 13th, 2018|Tutorial|

PowerPoint and Illustrator – Both Have Vector Shapes

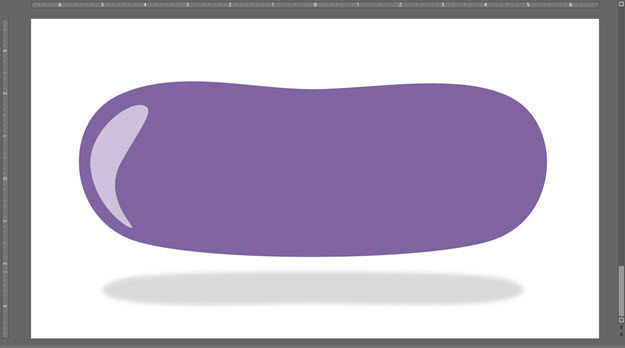
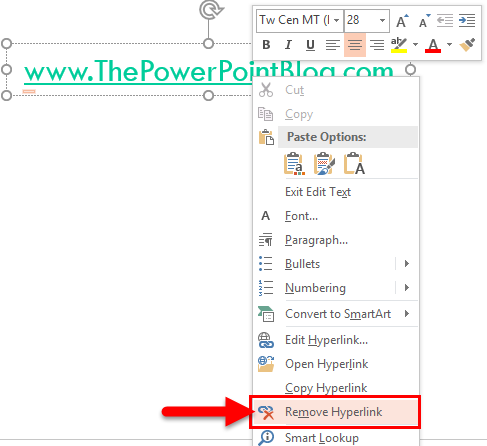
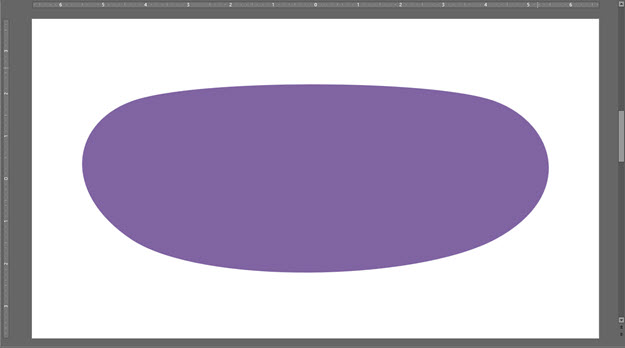
If you use Adobe Illustrator, or other vector art programs, you are familiar with Bezier curves. Vector art is scalable, without resolution loss, and is editable in both appearance and in shape. PowerPoint shapes are vector graphics and can be edited directly in PowerPoint just like editing vector art in Illustrator (but with a simplified set of options). For example, Christie on the TLC Creative design team created this example showing how a rectangle can be edited into a purple jelly bean shape – all inside PowerPoint, using native PowerPoint features.

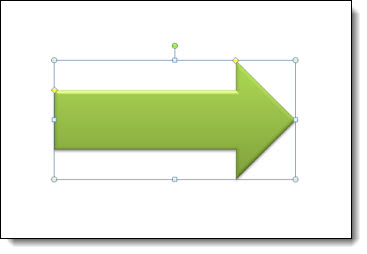
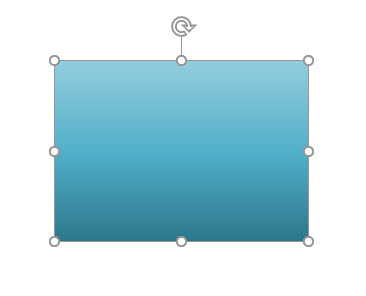
1. Create any shape in PowerPoint, mine is a purple rectangle

Shapes are Vector and Can Be Edited 1

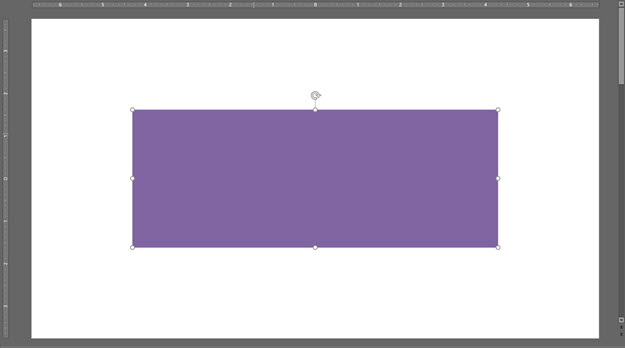
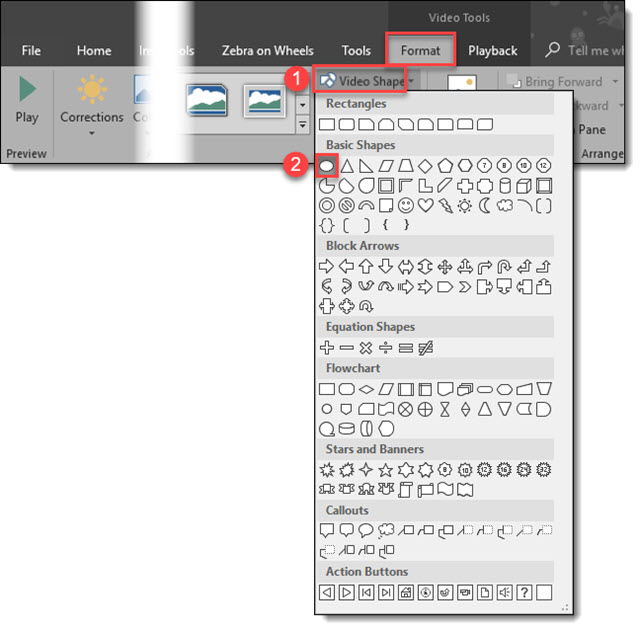
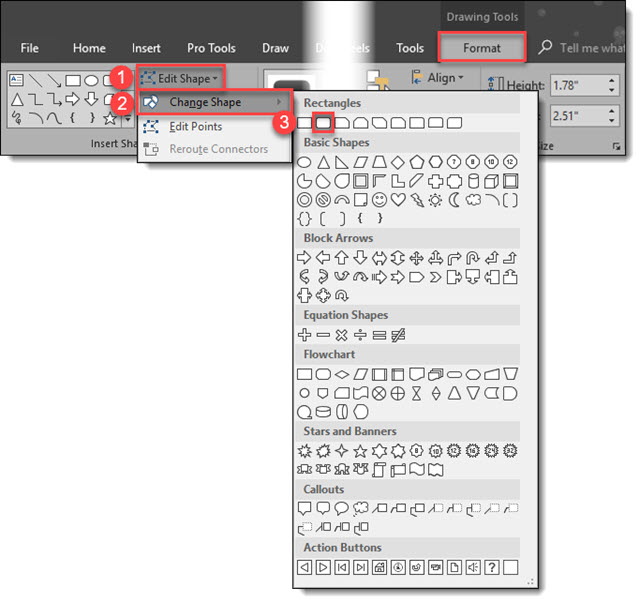
2. Right click on the shape and select EDIT POINTS

Shapes are Vector and Can Be Edited 2

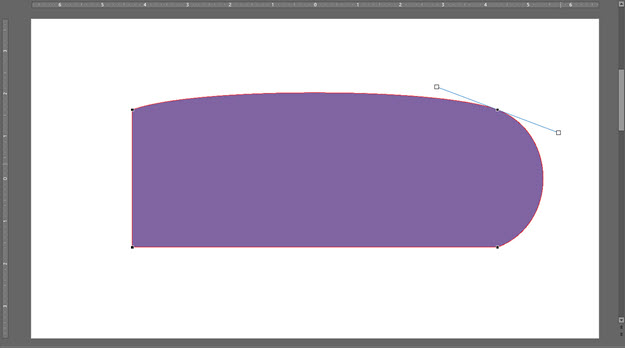
3. A rectangle is a simple vector shape with just 4 points, one for each corner. Click and select any of the points. The Bezier handles will display. Right-click the selected point and from the pop up menu we can change the type of Bezier corner.

PowerPoint points can be SMOOTH, STRAIGHT, or CORNER points. For a rectangle, with all straight edges, the points are CORNER points which keeps the Bezier handles straight and 90 degrees to each other. But to create my purple jelly bean I do not want the 90 degree corner and change its properties to SMOOTH. 

Shapes are Vector and Can Be Edited 3

4. The Bezier handles move outside the shape and it becomes a radius corner. 

Shapes are Vector and Can Be Edited 4

5. My purple jelly bean has no straight lines, so all 4 points are changed to SMOOTH points. The rectangle is now a “blob” with no straight edges. 

Shapes are Vector and Can Be Edited 5

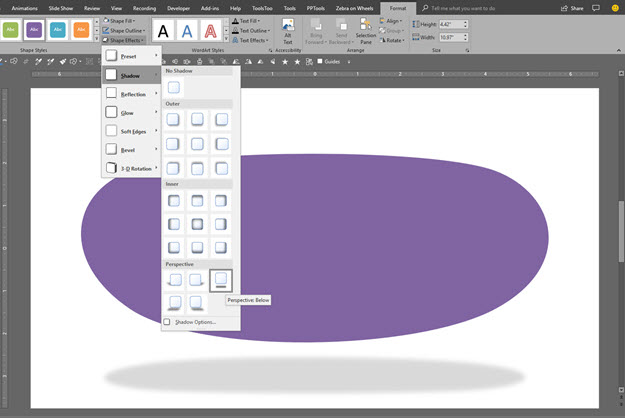
6. This next step has nothing to do with shape edit points, but I cannot leave a slide with an ugly shape, so I am adding a cast shadow.

Shapes are Vector and Can Be Edited 6

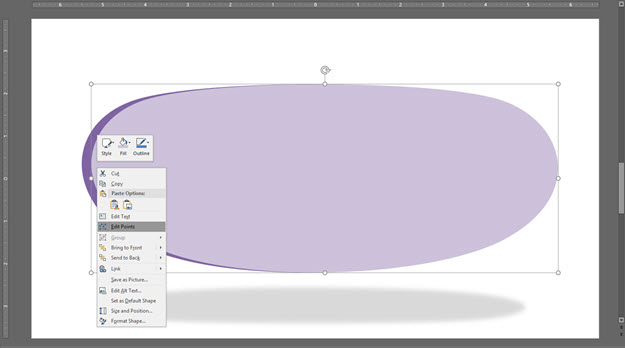
7. Back to editing shape points, and some design – duplicate the shape, change the color to a lighter shade of purple and then right-click and select EDIT POINTS.

Shapes are Vector and Can Be Edited 7

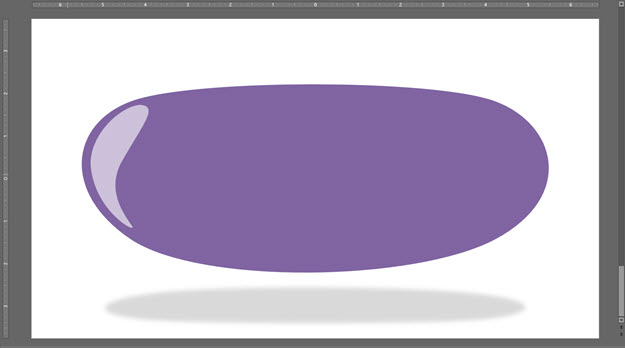
8. Through a combination of adding a few new points (also SMOOTH points) and moving the position of points and Bezier handles, it was pretty quick and easy to create a new custom shape that is now a highlight accent.

Shapes are Vector and Can Be Edited 8

9. To make the large blob shape more like a jelly bean, right-click > edit points > add a new point in the top center (make it a SMOOTH point) and drag it down a bit.

Shapes are Vector and Can Be Edited 9

10. Done – at least enough for this tutorial, and we never left PowerPoint. Think of it as working in a legacy version of Illustrator, maybe 2.0.

Shapes are Vector and Can Be Edited 10

By |2018-05-31T18:20:43-07:00June 11th, 2018|Tutorial|

It’s Like Monopoly – Go Directly to the Master Slide!

The Master Slide is where as presentation designers we try to keep clients away from. But as a designer, this is a fantastic shortcut to accessing the master slide!


As example, we want to change the background color across all slides. Easy, just update the Master Slide. The typical way of doing this is  View > Slide Master and the Master Slide view opens with that layout selected.

Directly to the Master Slide 1

However, we need to change the background color on the Master Slide, not the Master Layout. So now we need to scroll up and select the Master slide at the top. Too many steps for a busy presentation designer!

A quick and easy shortcut to achieve going directly to the Master Slide is to hold SHIFT + DOUBLE-CLICK on the NORMAL VIEW icon in the lower right bar.

Directly to the Master Slide 3

This is will automatically open the master to the top slide where you can quickly update all slide backgrounds.

Here it is in action, 1 click (okay a double-click) access to the Slide Master.

[KGVID]https://thepowerpointblog.com/wp-content/uploads/2018/10/unnamed-file-3.mp4[/KGVID]

Troy @ TLC

By |2019-12-11T15:57:41-07:00June 8th, 2018|Tutorial|

Rotate Objects with Keyboard

There are many ways to do the same task in PowerPoint, and all Microsoft Office applications. Rotating objects is one that many find difficult and tedious when using the rotate anchor. Using keyboard shortcuts to rotate an object (or several objects at the same time) is an amazing shortcut to know about!

Select any shape

Rotating Objects with Keyboard 1

Use the keyboard to rotate the shape to the right with ALT + RIGHT ARROW. Hold the ALT key down and click the right arrow as many times as needed to get the rotation desired.

Rotating Objects with Keyboard 2

Rotating Objects with Keyboard 3

This is pretty much intuitive at this point, but ALT + LEFT ARROW will rotate the selected object(s) to the left. To go from the above rotation to the below rotation it was hold the ALT key and click the left arrow twice

Rotating Objects with Keyboard 4

Rotating Objects with Keyboard 5

Happy rotating!

Troy @ TLC


By |2018-05-31T18:02:29-07:00June 6th, 2018|Tutorial|

Morph Any Shape to Another Shape While Creating A Presentation – Change Shape

Using existing assets is almost always faster than creating something new, or worse, creating something, again, and again, and again. Everyone should know of PowerPoints CHANGE SHAPE feature! For example, we have created a rectangle with a custom gradient. Now styling is going to be rounded rectangles. Easy, just do this: 

Select the rectangle.

Change Shape 1

Under the Drawing Tools > Format Tab, click Edit Shape > Change Shape > Rounded Rectangle.


Change Shape 2


The rectangle will now be converted to a rounded rectangle. Done!

Change Shape 3


Repeat to convert all the already formatted, positioned and animated rectangles throughout the presentation to the updated rounded rectangle styling in minutes. Or, leverage that wonderful custom gradient by morphing the rounded rectangle to an arrow, or any other shape in the Change Shape library. 

Change Shape 4

Tip: All TLC Creative design computers have the Change Shape drop down menu on our QAT for even quicker design and formatting.

Troy @ TLC

By |2018-05-31T18:03:20-07:00June 4th, 2018|Tutorial|

Nice Bar Chart

Often we create our own charts, not from the charting engine, but from shapes, text, and graphics. Of course, this is for highly visual presentations that we know are not going to rely on charts with data and can be adjusted for use in other presentations. So, this is as much about animation as slide content styling. Before the animation example, I want to show the design for the nice bar chart. Each bar is comprised of 4 graphic elements: red box with text top aligned, grey box with text bottom aligned, grey outline (no fill box), and a black line.

 nice bar chart

Here are the animated bar charts (sample video has 2 slides with visual bar charts, client content removed, and for example here only).

[KGVID]https://thepowerpointblog.com/wp-content/uploads/2018/05/unnamed-file-5.mp4[/KGVID]

Troy @ TLC

By |2019-10-30T06:00:52-07:00May 21st, 2018|PowerPoint|
Go to Top