gradient

A Cool PowerPoint Gradient

As we approach the 2021 Presentation Summit, I am finalizing my session talks (and packing equipment for our team to coordinate all live streaming of the entire conference – don’t miss the fun!). One of my talks is on using PowerPoint gradients as a design tool within PowerPoint. The gradients tool is very robust and over the years I have found myself less and less in Adobe Illustrator or even Photoshop, creating gradient styling elements, in favor of staying inside PowerPoint and having the gradients be editable there. Well, I am not giving away the talk (it is going to be good!), but I am highlighting one of the gradient examples our design team created, because it is amazing!

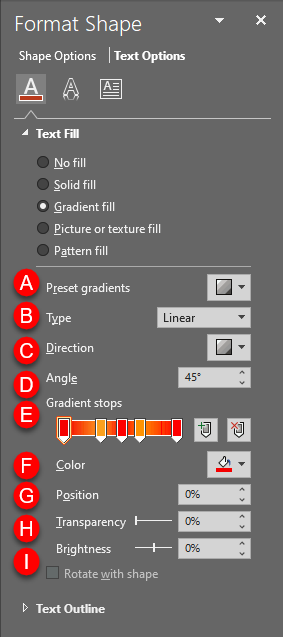
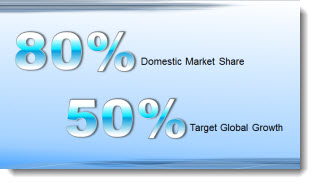
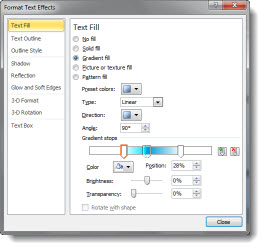
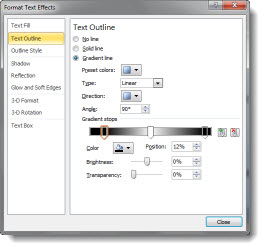
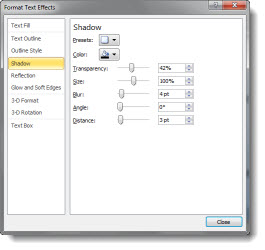
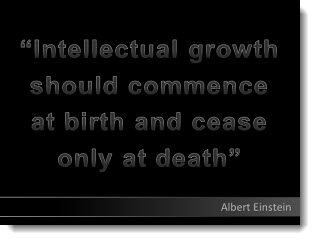
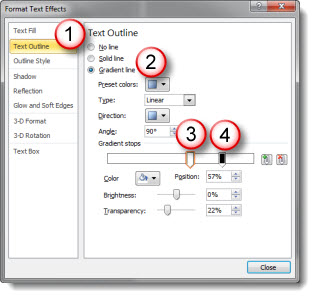
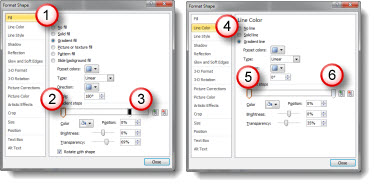
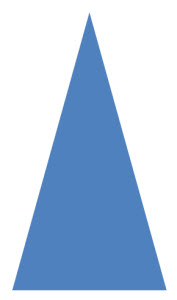
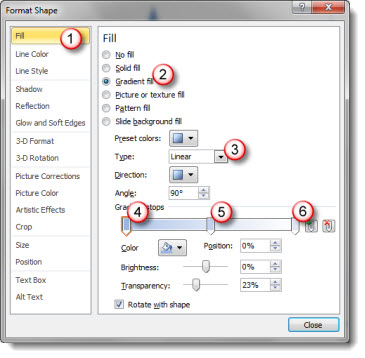
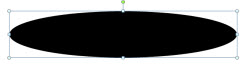
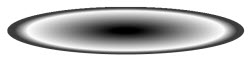
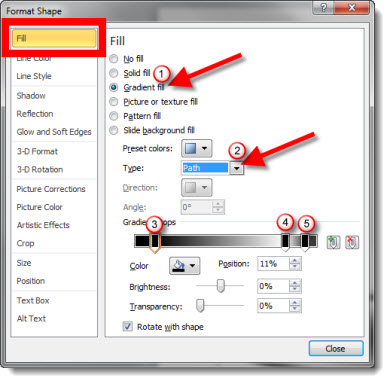
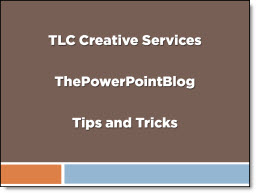
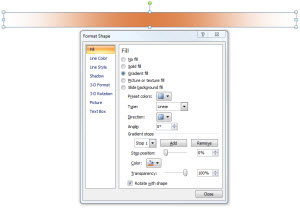
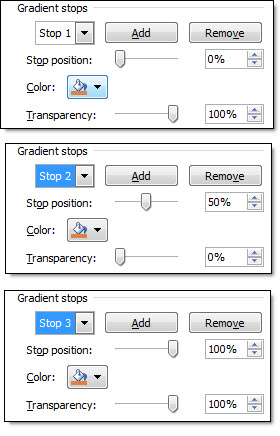
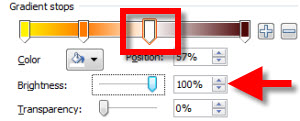
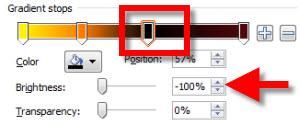
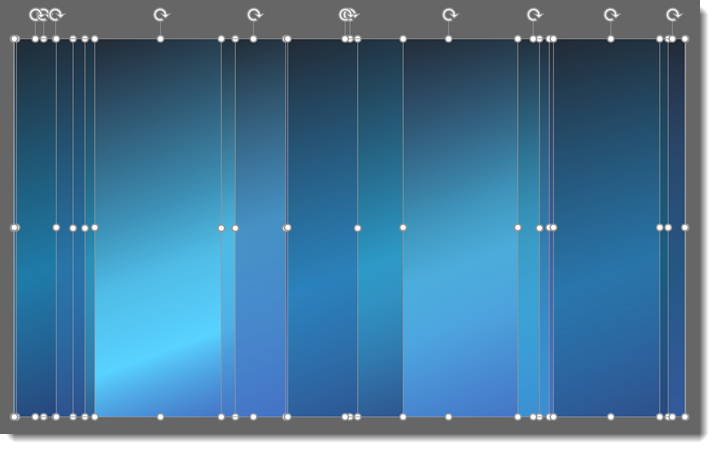
This beautiful slide background is 100% created in PowerPoint. It is a very creative use of PowerPoint gradients, and multiple overlapping PowerPoint shapes. As example, here is one of the vertical bands pulled from the background composite. It has a gradient fill created with 5 gradient stops, at a custom angle, and with varying opacity per gradient section.

On its own, the above gradient is not spectacular. It is technical, but not really amazing. The full background is a composite of 11 PowerPoint shapes over a white background slide to create a wonderful slide background.

For inspiration, the editable slide can be downloaded HERE.

Troy @ TLC

By |2021-09-12T13:11:42-07:00September 13th, 2021|Templates/Assets|

Fire & Ice Text (Gradient)

Text does not need to be a solid color and boring! As example, here are the two words Amber started with for this mini tutorial series.

Editable PowerPoint text does not need to be a solid color fill. Gradients take a bit of work, but can a great way to make text more visually interesting. And, this text is still editable! Because this text uses PowerPoint gradients, they can be applied to any other text with the Format Painter tool (to copy the style from one text box to another).

Each word is a separate text box and each has its own gradient fill styling. Here’s how the gradient was created:

  • Select the text
  • Under SHAPE FORMAT (A) on the ribbon, click the down carrot under TEXT FILL (B).
  • Mouse over GRADIENT (C) to show the gradient fly out menu and select the gradient you want (D).
  • These first options are created using the text fill the text is set to, this example being black (E). To see more PowerPoint created variations, click the MORE GRADIENTS (F) at the bottom of the fly out menu.


Click MORE GRADIENTS to see the FORMAT SHAPE pane. This is where we really have control to create custom gradients. The FIRE gradient is 5 gradient stops (eg. colors) set at an angle:

(A) PRESET GRADIENTS: These are gradients created using the 6 theme colors set in your file.

(B) TYPE: Change the type of gradient:
1. LINEAR: horizontal, vertical, diagonal
2. RADIAL: circular gradient starting from the center or from any of the 4 corners
3. RECTANGULAR: rectangular gradient starting from the center or any of the 4 corners
4. PATH: creates gradient in the shape of the object its filling

C. DIRECTION: Change the direction of LINEAR or RADIAL gradients

D. ANGLE: Change the angle of the direction of the gradient

E. GRADIENT STOPS: set the color points of the gradient. You can ADD (click anywhere on the gradient) or SUBTRACT (click and drag the gradient stop off) points and set the color of each.

F. COLOR: select the color for a gradient stop.

G. POSITION: you can fine tune the position of a gradient stop.

H. TRANSPARENCY: set transparency of a gradient stop.

I. BRIGHTNESS: set brightness of a gradient stop.


Download the FIRE & ICE gradient fill sample slide Here.

Troy @ TLC 

By |2020-01-04T17:18:10-07:00January 6th, 2020|Tutorial|

Creating the % Number Gradient Style

Here is the example slide from the previous post (download link below).

Here is a quick how-to on creating the custom text style. The “regular” text is Arial, 24 pt, bolded. The stylized text is Arial Black, 125 pt, bolded, drop-shadow, outline and gradient fill (so think BIG)

To create the gradient fill:
1. Type = Linear (= one direction)
2. Angle = 90 degree (= top to bottom)
3. Gradient Stop 1 = white, position 28%, transparency 05 (solid)
4. Gradient Stop 2 = bright cyan, position 46%, transparency 05 (solid)
5. Gradient Stop 3 = muted blue, position 48% (very close to the other blue), transparency 05 (solid)
6. Gradient Stop 4 = white, position 75%, transparency 05 (solid)

To see this gradient in PowerPoint (2010 is my recommendation for gradients (over 2007)), download here. (43K)

– Troy @ TLC

By |2016-08-16T09:40:12-07:00January 5th, 2012|Tutorial|

Custom Gradient Fill for Big Numbers

For this slide (see previous post for more info on it), I wanted the numbers to be a visual focal point. I also wanted to keep them as editable PPT text. By mixing the stylized text with more standard text, a nice slide layout was developed. The big number text was created by:

1. Make it big (this text is 125pt).

2. Give it a gradient fill – using colors that coordinate with the template color scheme.

3. Add a subtle outline (stroke) to the text to help it contrast for legibility.

4. Add a drop shadow.

The sample slide can be downloaded here.

– Troy @ TLC

By |2016-08-16T09:51:16-07:00October 7th, 2011|Personal, Portfolio, Templates/Assets|

Gradients for Custom Text

Final gradient sample (for this series). In this slide the gradient fill is used for the text outline, the box outline and the box fill.

One of the really great features is the ability to make lines gradient. On the text close-up it is easier to see the outline is opaque white at the top and gradients into a semi-transparent grey.

1. Select text, open the Format Text dialog and choose TEXT OUTLINE
2. Change Text Outline to GRADIENT LINE
3. Add a white gradient stop. I moved mine to the right to extend the amount of solid white at the top of each letter
4. Add a 2nd stop that is black and semi-transparent (or use an opaque grey for same effect)

For the lower box I combined a gradient fill and a gradient outline. This is great to be able to create a single element with custom design and text all in one element.

For the box fill, the gradient is right-to-left:
1. Choose FILL and angle is 180
2. White stop that is slightly semi-transparent
3. Black stop that is transparent

For the box outline, the gradient is left-to-right:
4. Choose LINE COLOR and GRADIENT FILL with angle 0
5. White stop that is slightly semi-transparent
6. Black stop that is transparent

Also, I set the right indent on the TEXT BOX section to .3 to inset the text equally on all slides.

Download the Gradient Text slide here (34k) .

– Troy @ TLC

By |2016-08-16T11:01:47-07:00October 15th, 2010|Tutorial|

Gradient Triangle Accent Elements

This is another layout recently developed for a project. The goal was to avoid a bulleted list and create a more dynamic, and memorable, graphic layout.

1. Create a tall triangle

2. Using the gradient fill options modify the triangle to move from semi-opaque to transparent

1. Open the FORMAT SHAPE dialog and go to the FILL section
2. Select GRADIENT FILL
3. Make certain the type is LINEAR
4. Stop 1 (top of triangle) is desired color and 20-25% transparency
5. Stop 2 (middle of triangle) is a lighter color and 40-50% transparency
6. Stop 3 (bottom of triangle) is any color and 100% transparency

3. The result transforms the triangle to this

4. And here is an example layout using all PPT shapes and text

5. The great thing is the triangles use transparency and not white, so they can be used on any background

Click here to download the slide layout (29K).

– Troy @ TLC

By |2016-08-16T11:02:24-07:00October 13th, 2010|Tutorial|

Gradient Circle Fill Effect

I have been experimenting with gradient fills for a recent project. First, the gradient tool in PPT 2010 is great! It still has some usability issues, but overall it is easy to use and has a lot of flexibility. Here is one effect I developed and below is a link to download a slide with the gradient shape.

1. Start with an oval. No outline and any fill.

2. After applying a custom gradient fill here is the result.

3. To create the gradient fill I adjusted 5 elements:
1. Open the FORMAT SHAPE dialog, go to the FILL section and for fill type choose GRADIENT FILL
2. Change the type of gradient to PATH
3. Make the far left color black. Slide to position of 10-15%. Transparency = 0% (solid black).
4. Move second color to right side at position of 80%. Make color white, or change Brightness to 100% (white) and set Transparency to 100% (no fill).
5. Add a third color bar/stop even further to the right at position of 95%. Make color white (or set brightness to 100% to change any color to white) and make it slightly transparent with Transparency at 25%.

4. Now position gradient cirle under any object for a bit of perspective.

5. Because the shape was created with transparency, it can go onto any color background.

Download slide with gradient shape here (35K).

– Troy @ TLC

By |2016-05-04T09:45:29-07:00October 11th, 2010|Tutorial|

Gradient Visual Dividers

Lots of slides have a few main points, like this example:

I like to add a simple divider line as a visual break between each line. And I create it in PowerPoint using a simple gradient fill. So my sample slide looks like this:

To create the divider line, start with added a basic rectangle – no outline and the fill color you want.

Then change to a Gradient Fill.

Creating the feathered edge is a bit tricky:
1. Type = Linear
2. Angle = 0
3. Stop 1: position = 0, color = your pick, transparency = 0
4. Stop 2: position = 50, color = your pick, transparency = 100
5. Stop 3: position = 100, color = your pick, transparency = 100
** Delete any additional stops (only want 3)

Last, adjust the rectangle height to be smallest possible.

Done!

– Troy @ TLC

By |2016-09-16T08:55:31-07:00March 26th, 2010|Tutorial|

#13 New and Improved Gradient Tool

Gradients in PPT 2007 made so many great things possible (eg. not having to go out to Photoshop). But the User Interface was not very user friendly (okay it scares most people in my training classes). Now PPT 2010 gives the gradient fill tool a GREAT User Interface!

Everything works the same, uses the same dialog boxes, accessed the same, etc.

Everything new is found in the Gradient Stops dialog. Here is my sample gradient with 4 stops:

The drop-down menu approach of PPT 2007 is replaced with a visual bar that shows each stop and is a live preview of the gradient. To change attributes of any stop, just click on the stop “arrow” – easy!

The Stop Position slider is gone as it is now integrated into the gradient bar. The Transparency slider remains and works the same. What is new is the Brightness slider. Here is my sample gradient with Stop 3’s Brightness at 100% – white:

Here is the same gradient with Stop 3’s Brightness at -100% – black:

0% is the true color with various tints created as the Brightness slider is used. I am not certain how much I will use this feature, but it’s there.

The real improvement is the Gradient Bar with its integrated Stops and live preview, something I will be using a lot!

– Troy @ TLC

By |2016-09-16T09:17:40-07:00November 30th, 2009|PowerPoint, Tutorial|

Gradient Fills to Text

I showed this effect earlier – but it is definitely worth looking at again. Here I have applied a gradient fill to the two key elements of the text box. The great thing is that gradient fills can also be applied to select text within one text box.

For design purposes on this one, I reversed the gradient so the top text goes from dark-to-light and the bottom text is the reflection of the gradient going from light-to-dark. And again, all of this remains editable text too. There is a lot of design potential with this feature!

– Troy @ TLC

By |2016-11-17T14:55:27-07:00November 23rd, 2007|Tutorial|
Go to Top