The PowerPoint Blog
  • Blog
  • Podcast
  • PowerPoint
    • PowerPoint
    • PowerPoint Design
    • PowerPoint Templates
    • Multimedia Integration
    • Presentation Messaging
    • Prezi, Keynote, ARS
    • PowerPoint Training
    • Show Site Expertise
    • PowerPoint Resources
  • Design
    • Graphic Design
    • Print
    • Large Format
    • Multimedia
    • Explainer Videos
  • Portfolio
  • Contact/About
    • About TLC
    • Contact Us
  • Portal
    • Client Area
    • Staff Area


Posts Tagged [ export ]

PPTools – Image Export

When you need to create images from slides, the PPTools Image Export add-in is invaluable.

StarterSet-7

PowerPoint 2016 has updated the built-in tool for saving slides as images – and it is really good. But, I still prefer to use the PPTools Image Export add-in. The reason is that the export dialog gives me complete control over the image(s) created.

ImageExport-1

  1. Select the format for the image (I generally use .png for my images)
  2. Select a range of slides or the entire presentation (Note: I do like PowerPoint’s option to export the selected slides, something you can manually type in slide numbers here, but a one-click button would be a great addition)
  3. Easily set a destination for the images
  4. Create a naming structure for the images (This is great when exporting images from different presenters or multiple versions of the same slides)
  5. Set the exported image size!


Find out more about PPTools Image Export tool on the web here.

-Troy @ TLC


On 13 Jun, 2016
Software/Add-Ins
By : TLC Creative
No Comments

Interlaced vs Progressive with Powerpoint

When it comes to exporting video in PowerPoint, or any other program, there are many factors that play a role in the final quality.

One of those factors is the concept of interlaced or progressive.

All PowerPoint videos export as progressive, but why?

In order to understand the answer, we first need to know what progressive vs. interlaced really means.

Here is the simple explanation:

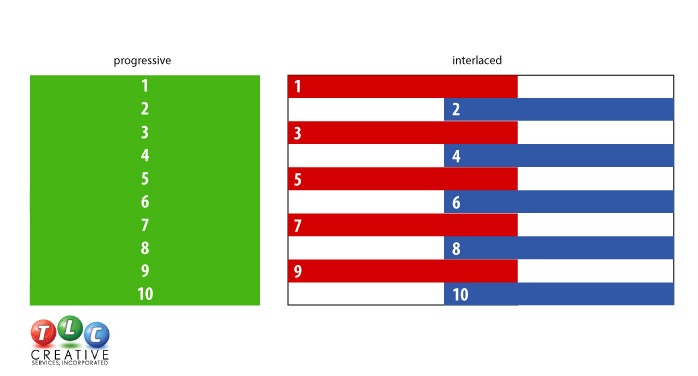
  • Interlaced is sending half the picture in 1 frame and the other half in the next frame. When done fast enough, the human eye sees a full picture.
  • Progressive is sending the entire picture on every frame.

progressive and interlaced video example

Interlaced video was made popular with television and over the air TV transmission (in the dark ages, before Cable TV). Interlaced video sends half the data and bandwidth, so it made TV signal transmission easier. For video editors, it made digital editing and processing faster because you were working with half the amount of data.

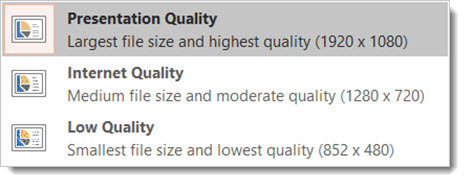
With current technologies of HD and beyond, computer monitors, television monitors and projectors, the idea of interlaced (or 1/2 quality) video is virtually a thing of the past. So 720p and 1080p stand for “progress video” at that resolution. 720i & 1080i means the video is interlaced at that resolution. If there is not an “i” or “p” after the resolution it is assumed to be progressive “p.”

Because progressive video has more data than interlaced video (entire picture in each frame vs. half the picture in each frame), it appears sharper and richer in color.

Progressive

progresive video

This technique, however, is not ideal for broadcasting, due to the amount of data that needs to be transmitted. This brings us to Interlaced video. For the most part, interlaced video is used by TV broadcasters. It outputs from two adjacent frames one after the other, blending odd and even lines to form each image.

Interlaced

interlaced video

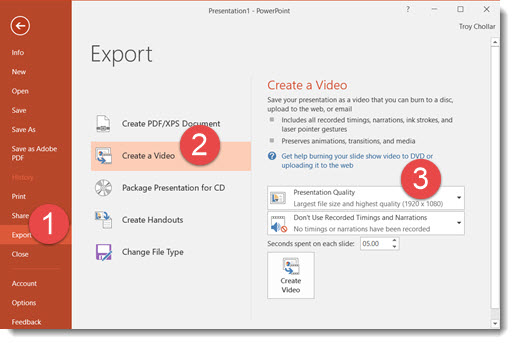
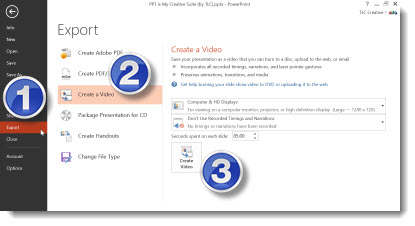
Quite a difference, right? To answer the original question “Is all PowerPoint video progressive?” – the answer is yes. PowerPoint’s video export only has profiles for progressive video, with 3 different resolution options. There is no practical need for interlaced video on any computer playback. If you are sourcing a video for a presentation and one of the options is progressive or interlaced, choose progressive.

-Troy @ TLC


On 04 Mar, 2016
PowerPoint, Resource/Misc
By : TLC Creative
No Comments

Powerpoint 2016 Image Export Improvements

Two ways to export images from PowerPoint 2016

Image Export Improvements in Powerpoint 2016 have made things more interesting. Depending on previous version used, this may have been an okay result to a not-so-good result. But that has changed for the better with PowerPoint 2016.

Image Export Improvements Option 1

Here is my sample slide to demo the PowerPoint 2016 image export. Single widescreen slide  (13.33″x7.5″) with a full frame image.
 Powerpoint 2016 with Image Export Improvements 1

The original image inserted was very large (for PowerPoint needs) at 5184x3456px.
 Powerpoint 2016 with Image Export Improvements 2

A great way to export a number of slides as images is through the SAVE AS option. This export option can be used for a single slide, a selection of slides, or an entire presentation.

Go to FILE > SAVE AS > and click the SAVE TO TYPE drop down.
 Powerpoint 2016 with Image Export Improvements 3

From the available list, select .PNG or .JPG format (personal preference).
 Powerpoint 2016 with Image Export Improvements 4

Exporting this way creates good image at 1280×720 – the low end of HD resolution.
 Powerpoint 2016 with Image Export Improvements 5


Image Export Improvements Option 2

To export a single image, not a full slide, multiple images or slides. The advantage is a much higher resolution image.

Select the image, right click and select SAVE AS PICTURE.
 Powerpoint 2016 with Image Export Improvements 6

Exporting this way creates a much higher resolution image (depending on the original image size). This image exported to 2000x1122px.
 Powerpoint 2016 with Image Export Improvements 7


Conclusion

The 2 options are available and use based on what is needed. I will also say that when working with very unique page sizes (e.g. 50″x 9″), slide export as images do a much better job than previous versions.  Note: there are several 3rd party add-ins that export slides as images in a variety of formats and to any pixel size needed (Here at TLC Creative, all computers have PPTools Image Export installed).


-Troy@TLC


On 12 Feb, 2016
PowerPoint
By : Troy Chollar
No Comments

Video Export Size (HD!)

Another behind the scenes upgrade in PowerPoint 2016 is the video export size options. Now true, 1920×1080 HD video can be exported from PowerPoint.

Go to FILE > EXPORT > CREATE A VIDEO
Video Export Size 1

The export size options have been revised to 1920×1080, 1280×720 (the PPT 2013 highest res option), and 852×480.

Video Export Size 2


-Troy @ TLC


On 10 Feb, 2016
PowerPoint, Software/Add-Ins
By : Troy Chollar
No Comments

PowerPoint As a Video Editor – Combine Video Clips

PowerPoint has some very good video features, such as the ability to play multiple video formats, embed videos into the slide deck file, visually stylize the video and export video from the PowerPoint.

It is the export video feature that is being used for this tutorial.
Here are three videos that are inserted into PowerPoint 2013.

Each video is set to auto play, one after the other.

Then, go to FILE.

EXPORT >> CREATE A VIDEO >> CREATE VIDEO

The result is a single video file that was previously 3 separate videos.

– Troy @ TLC


On 16 Nov, 2013
Tutorial
By : Troy Chollar
No Comments

#9 – Export Presentation as Video

This one could easily be in my top 5, but there is so much good stuff in this version of PowerPoint it makes the top 10 list.

Yes, PowerPoint for Mac has had an export to video function for a few versions. Yes, Keynote has had an export to video function. Yes, I like everyone else has wanted, needed, hoped for this function and have invested lots of money in third party solutions. Well it is here and it works incredibly well!

1. It is easy to do. Go to BACKSTAGE >> SHARE >> CREATE A VIDEO

2. Pick a quality level (High Quality = 720p (1280x720px))

3. Watch the progress bar and when done, watch your presentation as a video!

Observations:
– Only exports to .wmv format
– Appears to be be frame accurate (eg. no gaps or jumps in animation)

– Troy @ TLC


On 20 Nov, 2009
Software/Add-Ins
By : Troy Chollar
No Comments

Online Movie Tutorial : Export image from PPT to add PhotoShop Dropshadow

I have just completed a screen capture tutorial that walks through the process of exporting an image from a presentation, opening it in PhotoShop, adding a soft dropshadow, properly saving it out and then inserting back into the presentation. This is a 4 minute narrated online movie, because if a picture is worth a 1,000 words, seeing a real demonstration is worth hours of frustration! To view click here.

– Troy @ TLC


On 28 Jun, 2006
Tutorial
By : Troy Chollar
No Comments


Categories

  • The PowerPoint® Blog
    • Personal
    • Portfolio
    • PowerPoint
    • Resource/Misc
    • Software/Add-Ins
    • Templates/Assets
    • Tutorial
  • Uncategorized

Pages

  • Home

Archives

  • December 2019
  • November 2019
  • October 2019
  • September 2019
  • August 2019
  • July 2019
  • June 2019
  • May 2019
  • April 2019
  • March 2019
  • February 2019
  • January 2019
  • December 2018
  • November 2018
  • October 2018
  • September 2018
  • August 2018
  • July 2018
  • June 2018
  • May 2018
  • April 2018
  • March 2018
  • February 2018
  • January 2018
  • December 2017
  • November 2017
  • October 2017
  • September 2017
  • August 2017
  • July 2017
  • June 2017
  • May 2017
  • April 2017
  • March 2017
  • February 2017
  • January 2017
  • December 2016
  • November 2016
  • October 2016
  • September 2016
  • August 2016
  • June 2016
  • May 2016
  • April 2016
  • March 2016
  • February 2016
  • January 2016
  • December 2015
  • October 2015
  • September 2015
  • August 2015
  • July 2015
  • March 2015
  • February 2015
  • December 2014
  • November 2014
  • October 2014
  • September 2014
  • July 2014
  • June 2014
  • May 2014
  • April 2014
  • March 2014
  • February 2014
  • January 2014
  • December 2013
  • November 2013
  • October 2013
  • September 2013
  • August 2013
  • July 2013
  • June 2013
  • April 2013
  • March 2013
  • February 2013
  • January 2013
  • December 2012
  • November 2012
  • October 2012
  • September 2012
  • August 2012
  • July 2012
  • April 2012
  • March 2012
  • February 2012
  • January 2012
  • December 2011
  • November 2011
  • October 2011
  • September 2011
  • August 2011
  • July 2011
  • June 2011
  • May 2011
  • April 2011
  • March 2011
  • February 2011
  • January 2011
  • December 2010
  • November 2010
  • October 2010
  • September 2010
  • August 2010
  • July 2010
  • June 2010
  • May 2010
  • April 2010
  • March 2010
  • February 2010
  • January 2010
  • December 2009
  • November 2009
  • October 2009
  • September 2009
  • August 2009
  • July 2009
  • June 2009
  • May 2009
  • April 2009
  • March 2009
  • February 2009
  • January 2009
  • December 2008
  • November 2008
  • October 2008
  • September 2008
  • August 2008
  • July 2008
  • June 2008
  • May 2008
  • April 2008
  • March 2008
  • February 2008
  • January 2008
  • December 2007
  • November 2007
  • October 2007
  • September 2007
  • August 2007
  • July 2007
  • June 2007
  • May 2007
  • April 2007
  • March 2007
  • February 2007
  • January 2007
  • December 2006
  • November 2006
  • October 2006
  • September 2006
  • August 2006
  • July 2006
  • June 2006
  • May 2006
  • April 2006
  • March 2006
  • February 2006
  • January 2006

© Copyright 2019 TLC Creative Services, Inc. Privacy Policy.