desktop

Windows 10 Desktop & Mobile, PowerPoint Desktop, Universal & Web Explained

Many thanks to Peter at Microsoft for helping clear up the confusion I was having on what the various editions of Windows and Office options and versions are now apart of the ecosystem. Here is my recap:
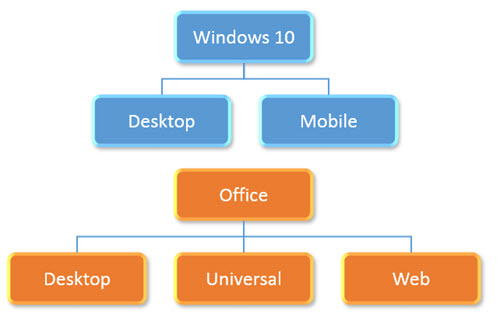
Win10-Office-Explained

Windows 10:

– Windows 10 is available in 2 editions; Desktop and Mobile (and really several other versions for Hololens, IoT devices, etc. – but we are only concerned with the 2 that can run Office apps).

– Windows 10 desktop is for Intel-based computers and can run Office Win32 apps and the new Universal apps.

– Windows 10 Mobile is for ARM-based mobile devices (phones and tablets) and can only run Universal apps.

Office Desktop:

– Desktop apps are the traditional “full” application and only run on full power (Intel) computer devices.

– Desktop apps are available in 32-bit and 64-bit versions.

– Desktop apps can install 3rd party add-ins.

– Desktop apps can run in a window of any size (or multiple side-by-side).

– Desktop apps are named just the app name; PowerPoint, Word, Excel, etc.

Office Universal:

– Universal apps are a new build option.

– Universal apps can be installed on both the Windows 10 Desktop and Windows Mobile operating systems.

– Universal apps are available through the Windows Store, as individual apps (there is no single install that includes all Office apps).

– Universal apps run in full screen mode only (eg. the application fills the entire screen, so no task bar or other apps until it is minimized or closed).

– Universal apps (this is a confusing point) are named different depending on where they are installed:

  • On Windows 10 Desktop, they have “mobile” in the app name; PowerPoint Mobile, Word Mobile, Excel Mobile, etc.
  • On Windows 10 Mobile they have just the app name; PowerPoint, Word, Excel, etc.

Office Web:

– Web apps are separate from Desktop and Universal apps.

– Web apps do not require installation, which allows them to work on both desktop and mobile devices.

– Web apps use HTML/CSS/JavaScript browser-based coding hosted on Microsoft servers.


The main recap is that today there are a lot more options available than in the past. The good news is, virtually every computing device and platform is covered for Office/PowerPoint. The bad news is that every option has slightly different capabilities and limitations. Things are filled with different frustrations today, and tomorrow we will have different frustrations – but solving those frustrations for our wonderful clients is what keeps us busy!

– Troy @ TLC

By |2016-08-10T08:58:55-07:00August 31st, 2015|Resource/Misc|

PPT Web vs. Desktop Slideshow

I have been using the Office Web Apps beta and created this presentation to test how things look and animate when run as a slideshow on my desktop and then uploaded and run through the online PPT Web App.

– 4 slides
– Fade transition on each
– Inserted graphics (arch and speedometer)
– PPT text
– All elements animated

Slideshow on desktop:
PPT Slideshow From Desktop

Slideshow on web:
PPT Slideshow From Web
*Note last animation changed from Faded Zoom to Zoom In

– Troy @ TLC

By |2016-09-16T09:25:58-07:00October 29th, 2009|Portfolio|

Use Nvidia Control Panel to Set Mirrored or Extended Desktop

PowerPoint presentations given to a live audience usually involve the computer being attached to a projector. And sometimes the technical issues of getting the computer and projector to cooperate are the downfall of the presenter…

Here is what I hear a lot:
– I have a great laptop!
– I hooked up the projector (via VGA or DVI cable).
– I clicked the Function + F4 keys.
– Nothing happened, my presentation would not show up!

It happens and there are technical complexities, but I run anywhere from 1 to 12 computers outputting to projectors for any given meeting. Here is my approach to assuring the presentation shows up on the projector (note: the following tutorial is based on the Nvidia Control Panel as most of show computers currently run their graphics cards).

1. First, I do not use the Function+F4 key. This is just a shortcut to the control panel that does not show me any of the real settings.

2. I open the graphic card control panel. My preferred method is to right-click the desktop and select “NVIDIA CONTROL PANEL”

3. This opens the Nvidia Control Panel. From here you can see and adjust every aspect of how images are put onto any monitor, or projector, connected to the computer/laptop.

4. I first go to CHANGE RESOLUTION. I can quickly see on the right if the computer ‘sees’ the 2nd monitor/projector by the two display icons.

5. If 2 icons are seen I go to #6. If only 1 icon is seen (the laptop monitor) I then have a few steps:
A. Check cable is plugged into computer.
B. Check cable is plugged into projector (or switcher).
C. Verify projector is powered on and set to correct input.
D. If using a docking station for the laptop (as I do), check docking station has power by checking power supply has light, is plugged into dock and dock has power lights (video out from all docks is not passive and will not work if dock does not have active power).
E. Run the RUN MULTIPLE DISPLAY WIZARD to force the graphics cards to identify and recognize the external monitor.

6. To setup a projector I go to the SETUP MULTIPLE DISPLAYS option.

7. On the right I can tell the computer how I want to use the projector.

1. Do not connect to projector
2. Mirror output to projector (most common setting)
3. Extend desktop to projector

8. Click APPLY.

9. Then go back to CHANGE RESOLUTION. Now the focus is on the resolution setting on lower part of the right side. This number has to be set to match the projector’s resolution.

– If the resolution is set to high, the projector may be unable to use it (and will display nothing).
– If the resolution is set to a widescreen format (as many laptop monitors are) and the projector is not widescreen it will either compress the image or add black letterbox bars (neither is a good option), so the resolution will need to be set to a 4×3 aspect ratio (eg. 1024×768 is the most common).

10. Click APPLY, exit the control panel and get on with the presentation – yeah!

– Troy @ TLC

By |2016-09-16T09:45:10-07:00August 28th, 2009|Resource/Misc, Software/Add-Ins, Tutorial|

Make Your Desktop Presentation Worthy

This is one of the nifty features of Windows (XP) that no one seems to know about. Before a presentation, I use the “show/hide desktop icons” feature to hide every single item on my desktop. That way if I need to exit a presentation for any reason, the only thing projected is a my desktop wallpaper. After the presentation, I restore all in just one click.

1. Right-click desktop
2. Go to Arrange Icons By
3. Select Show Desktop Icons
4. Let the screen refresh (may take a few moments) and you are left with a completely clutter free view!

– Troy @ TLC

By |2016-11-17T16:31:04-07:00October 12th, 2007|Tutorial|
Go to Top