Final gradient sample (for this series). In this slide the gradient fill is used for the text outline, the box outline and the box fill.

One of the really great features is the ability to make lines gradient. On the text close-up it is easier to see the outline is opaque white at the top and gradients into a semi-transparent grey.

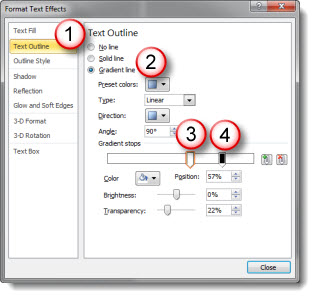
1. Select text, open the Format Text dialog and choose TEXT OUTLINE
2. Change Text Outline to GRADIENT LINE
3. Add a white gradient stop. I moved mine to the right to extend the amount of solid white at the top of each letter
4. Add a 2nd stop that is black and semi-transparent (or use an opaque grey for same effect)
For the lower box I combined a gradient fill and a gradient outline. This is great to be able to create a single element with custom design and text all in one element.

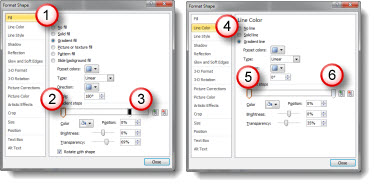
For the box fill, the gradient is right-to-left:
1. Choose FILL and angle is 180
2. White stop that is slightly semi-transparent
3. Black stop that is transparent
For the box outline, the gradient is left-to-right:
4. Choose LINE COLOR and GRADIENT FILL with angle 0
5. White stop that is slightly semi-transparent
6. Black stop that is transparent
Also, I set the right indent on the TEXT BOX section to .3 to inset the text equally on all slides.
Download the Gradient Text slide here (34k) .
– Troy @ TLC