Software/Add-Ins

Quickly Open The Windows Task Manager

Keyboard shortcuts are fantastic time savers. Recently, I was reintroduced to a Windows keyboard shortcut while I have been watching the PowerPoint performance on some animation/image/video heavy presentations. What I want is the Windows Task Manager to be open on one screen so I can see how the computer is processing the presentation.

windows task manager

The fastest way to open this dialog box is with a 3 key, keyboard shortcut: CTRL + SHIFT + ESC

windows task manager


-Troy @ TLC

By |2016-11-29T15:21:13-07:00November 30th, 2016|Software/Add-Ins|

Online Time Calculator

This one of those great, free, online apps that just makes life easy for certain projects.

Online time calculator

There is not much to the webpage (in design or content) – which means no annoying ads. So, what would this simple online time calculator app be good for? – Math! For example:

You have 9 videos and need a total run time – drop in the 9 times and it provides a total. Reorder to get the best combination to have a break at the 10 minute mark. If you have 9 presenters, 90 second transitions, a 2:00 minute opening video, and anything more – drop in the times for each and get a total run of show. If you have 10 autorun slides, each with a 1 second transitions, and you look at the animation pane for the animation duration – drop in all the times and you get a total presentation duration.

This is a simple and good resource to have when needed. I recommend bookmarking the Time Calculator webpage for any future needs.

-Troy @ TLC

By |2016-11-29T15:06:40-07:00November 28th, 2016|Software/Add-Ins|

NXPowerlite Black Friday 50% Off Deal

nx-1

TLC Creative Services has been a long-time user of NXPowerlite to quickly optimize presentation files to manageable sizes – without losing image quality (see this post on the TLC’s custom NXPowerlite settings). Microsoft’s internal image compression has improved a lot over the past few generations of PowerPoint, but I still find 3rd party tools do a better job. No sponsorship here, just letting everyone know that the NXPowerlite Black Friday sale is a good deal to take advantage of if you do not have an add-in to optimize presentation files.

NXPowerlite Black Friday

The Windows Desktop version is regulary $50. Purchase Friday, November 25th at 50% off. $25 is a great value and a smart addition to any designer’s toolbox. Go here for the Neupower sale page.

nx-3

-Troy @ TLC

By |2016-11-29T15:12:23-07:00November 23rd, 2016|Software/Add-Ins|

Video Demo of Zoom

PowerPoint is adding a new feature named ZOOM.

zoom 1

Zoom leverages the Morph transition and Sections to create a new way to quickly develop non-linear presentations with a new dynamic visual effect. Here is a quick demo of how easy it is to create custom shows within a presentation using Zoom.

[KGVID]https://thepowerpointblog.com/wp-content/uploads/2016/08/unnamed-file-2.mp4[/KGVID]


– Troy @ TLC

By |2019-10-31T22:13:10-07:00August 11th, 2016|PowerPoint, Software/Add-Ins|

NXPowerLite PowerPoint Add-in

PowerPoint file size too big? Sometimes that’s okay if it has embedded videos, or just has a lot of slides. But if your 11 slide presentation has no videos and is 30+ MB, it is time for some file optimization. PowerPoint has built in tools to optimize images and multimedia – and they continue to improve. But for image optimization, I prefer to use one of the 3rd party add-in options, the NXPowerLite PowerPoint Add-in.

For TLC Creative Services, we have NXPowerlite installed on all computers and use as needed. As stated on their site, what this add-in does is, “Shrink Your Files.” I’ve put together a quick explanation of how we use this at TLC.
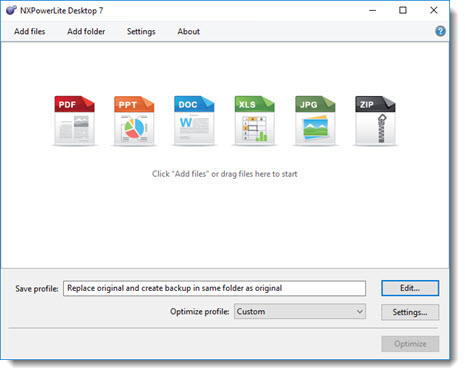
NXPowerLite

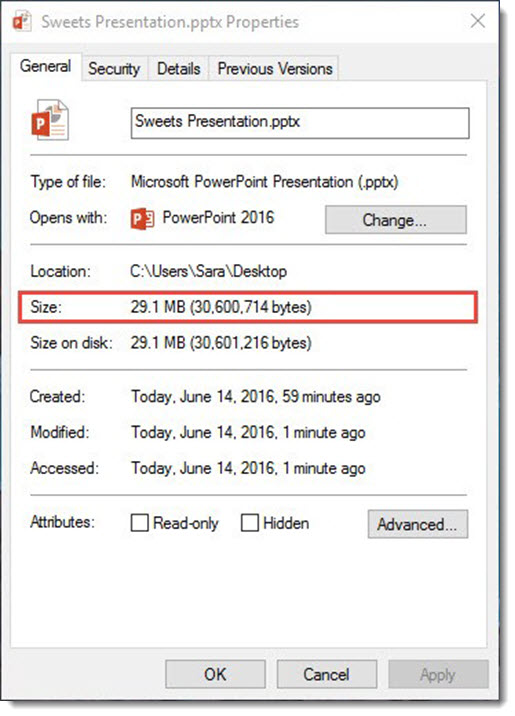
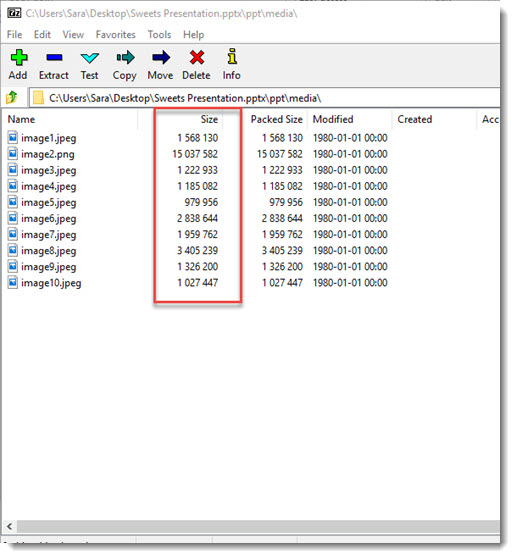
In this example, we’ve added a HiRes image to a PowerPoint Presentation. Our simple 10 slide presentation is a 29.1 MB file.

NXPowerLite PowerPoint Add-in-1

The images within the presentation are 15MB, because they are far larger than HD projection, most are “print” quality resolution. By using the NXPowerLite PowerPoint Add-in, we can optimize these images in order to reduce file size.

NXPowerLite PowerPoint Add-in-2

Step 1: Save your presentation.

Step 2: Go to the ADD-INS tab > OPTIMIZE WITH NXPOWERLITE

NXPowerLite PowerPoint Add-in-3

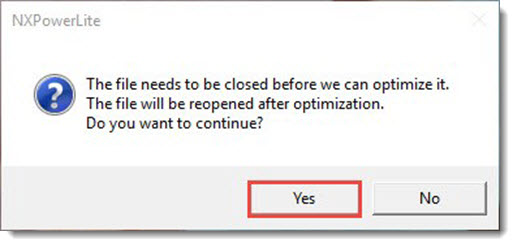
Step 3: Select YES at this pop up dialog (unless you do not want to save over this file because you did not do Step 1 yet, then cancel, save the presentation and come back to this step when you can select YES).

nxpowerlite-4

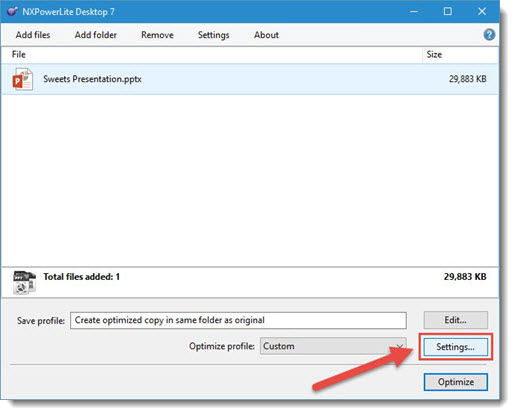
Step 4: Custom the NXPowerLite SETTINGS.

NXPowerLite PowerPoint Add-in-5

Step 5: This should be a one-time process as NXPowerlite will remember your custom settings.

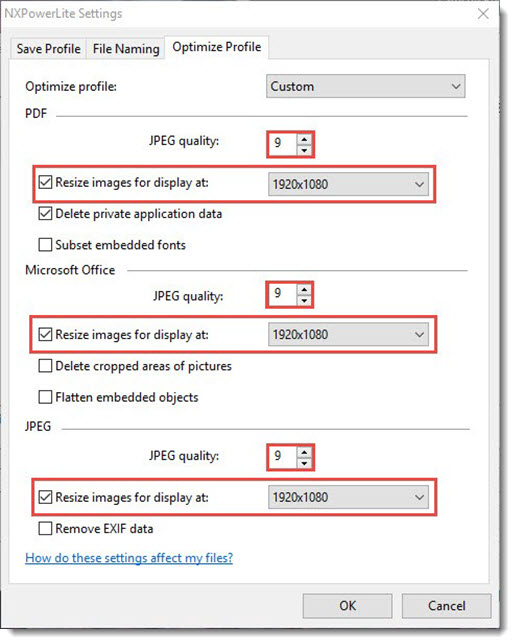
  • JPEG quality =9 on all three options
  • Resize Images For Display At = 1920×1080 on all three options
  • delete Cropped Areas in Pictures = NOT checked
  • Flatten Embedded Objects = NOT checked
  • Click OK to save these settings and close the Settings dialog box

NXPowerLite PowerPoint Add-in-6

File Naming

Before we Optimize the file click on the File Naming tab. Here you can customized the text prior to Optimizing the file.

1) File Naming Tab

2) You can add custom text that will be added to your Original file name

3) The custom name will be added AFTER your file name

4) The custom name will be added BEFORE your file name

NXPowerLite PowerPoint Add-in-12


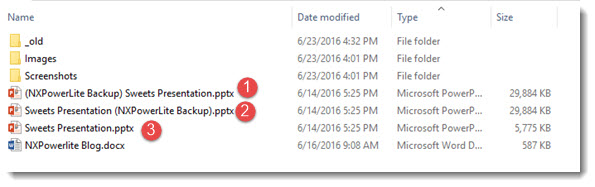
Here’s an example of the Outputted files

1) Backup of the original File name with the Custom Text BEFORE

2) Backup of the original File name with the Custom Text AFTER

3) Optimized file gets outputted with Original File Name

nxpowerlite-11


Back in the NXPowerLite dialogue, confirm the presentation is selected and click OPTIMIZE.

NXPowerLite PowerPoint Add-in-7

When NXPowerlite is finished, it displays the original and the optimized file size. In your project folder will be both the original (name now appended) and the new optimized version.

NXPowerLite PowerPoint Add-in-8

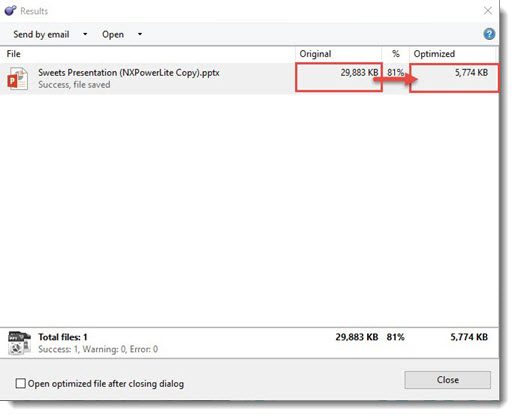
Looking at the new optimized file, all of the images have been adjusted to HD (1920×1080 display resolution) and are approximately 6 MB (with no visible quality loss for the slide show)!

NXPowerLite PowerPoint Add-in-9

From the entire TLC team, thank you to the NXPowerLite PowerPoint add-in for making our jobs a bit easier and quicker!


– Troy @ TLC


By |2016-08-10T08:00:49-07:00June 29th, 2016|PowerPoint, Resource/Misc, Software/Add-Ins|

Motion Path Tool PowerPoint Add-in

Shyam Pillai is an incredibly talented and knowledgeable coder. Fortunately for everyone that uses PowerPoint, he has shared some of his expertise by releasing a number of incredible add-ins over the years. If you use Motion Paths in PowerPoint, this FREE add-in is a must have.

The Motion Path Tools add-in shows up in its own tab called “Tools.” When you have a Motion Path applied to an object, this add-in will copy the object and place the copy at the end position of the path. This is very helpful for lots of animation and layout needs – and can save lots of time!

The add-in is found on a new TOOLS tab (where the developer has most of his add-ins install too).

Motion-Path-1

Here is a quick example slide with a motion path applied to the shape.

Motion-Path-2

Starting with PowerPoint 2013, clicking on the shape while in the animation tab displays a ghosted version of the shape where the Motion Path ends – a very helpful improvement to PowerPoint!

Motion-Path-3

But in this example, what we really need is a copy of the shape in that end position.

  • Select the shape
  • Go to TOOLS > END POSITION

Motion-Path-4

  • In the Motion Path Tools dialog, select the path you want to copy (this is pretty nifty because if you have multiple paths on a slide, they will all be listed here).

Motion-Path-5

  • Click OK and the add-in instantly copies the original shape (or photo or anything the motion path is applied to) and places the copy at the end point of the path!

The most common design task is to copy that new shape, delete it from that slide, and paste it onto the next slide. Now the Motion Path animation happens, go to the next slide and the shape is seamlessly in the same place!

Get more details and download (this amazing add-in is FREE) here.


– Troy @ TLC

By |2016-08-10T08:01:19-07:00June 22nd, 2016|Software/Add-Ins|

Zebra on Wheels Position and Size – Demo

Sometimes, the real power of an add-in is when it is used in combination with a PowerPoint tool. That is exactly what happens here as TLC designer Sara shows in this example of everyday PowerPoint formatting made much easier with Zebra on Wheels, which we also covered in the previous post here.

Zebra-1

PowerPoint’s built-in format tool, the Eyedropper, can pick up font styling, line spacing, etc. and apply it to another set of text. This is a quick and easy way to achieve consistency throughout your presentations. Below is a quick example of what you can do with this great tool.

Image-1

Image-2

However, with your free download of the Zebra on Wheels add-in, you can copy location and size of the text box, that you cannot with the eye dropper tool.

Image-3

Image-4

Using the Eyedropper tool, the reference text box has been formatted to match what will be the master formatting used throughout the deck.

Image-5

Using Zebra on Wheels’ location and size tool, the reference text box is now in the same exact position and size as the master. This is important for line wraps, when the citation/references are long.

Alone, both of these tools are great, but together, they make it possible to go through an entire 80 slide deck in less than 5 minutes and have every reference text box formatted identically throughout.

Zebra on Wheels add-in can be found at their website here.

-Sara @ TLC

By |2016-08-10T08:05:46-07:00June 20th, 2016|Software/Add-Ins|

Zebra on Wheels PowerPoint Add-in Review

Zebra on Wheels is another PowerPoint add-in that is FREE. Despite it being available for a few years, it is not common, partly because it is the name of a design firm based in the Netherlands.

Zebra add-in-1

They developed their own PowerPoint add-in tool bar to make their presentation design easier, named it after the company and have generously made it available on their company website!

Zebra add-in-2

Here are a few examples of tools in the Zebra on Wheels add-in we use at TLC:

[KGVID]https://thepowerpointblog.com/wp-content/uploads/2016/06/unnamed-file-3.mp4[/KGVID]

To find more info or download Zebra on Wheels, click here.

~Troy @ TLC


By |2019-10-28T15:26:33-07:00June 17th, 2016|Software/Add-Ins|

ToolsToo PowerPoint Add-in

ToolsToo is the creation of another independent developer, and when it comes to making PowerPoint more productive, ToolsToo is amazing!

ToolsToo-1

The add-in has over 70 tools included, so it is a good thing it installs its own ribbon tab to house them all.

ToolsToo-2

On the technical side, ToolsToo is one of the few add-ins that is compatible with both 32-bit and 64-bit Office (virtually all add-ins are only 32-bit compatible). It is coded as a .com add-in vs. a VBA add-in which is more common. It is also one of the few add-ins that can have any button individually added to the QAT, which is great! Lastly, it is also economical costing only $20.00 for the full host of productivity tools.

When developing slides, I make use of the Adjoin, Stretch, Align, Make Same, and Shape Tools section (which means I use a lot of tools from this add-in!). Here are a few of my favorite tools within the ToolsToo add-in:

Make Same Size, Make Same Height, Make Same Width: Select shapes or images and instantly adjust so they are the same size based on the first item selected!

[KGVID]https://thepowerpointblog.com/wp-content/uploads/2016/06/unnamed-file-2.mp4[/KGVID]

Make Same Rounded Corner: This is an agony point in designing with PowerPoint. The rounded corners automatically adjust their size based on the size of the shape/image and there is no way to set them to be the same across shapes. ToolsToo is worth the price just for the Make Same Rounded Corner tool!

[KGVID]https://thepowerpointblog.com/wp-content/uploads/2016/06/unnamed-file-1.mp4[/KGVID]

Make Line Horizontal, Make Line Vertical: Another pain point in designing content is determining if a line is truly straight, or 1/2 degree off… This simple tools forces a line to horizontal or vertical with one click.

[KGVID]https://thepowerpointblog.com/wp-content/uploads/2016/06/unnamed-file.mp4[/KGVID]

There are a lot of tools in this add-in. ToolsToo has become my highest used add-in when designing presentations.

Find out more at the ToolsToo site here.

-Troy @ TLC


By |2019-10-28T10:04:31-07:00June 15th, 2016|Software/Add-Ins|

PPTools – Image Export

When you need to create images from slides, the PPTools Image Export add-in is invaluable.

StarterSet-7

PowerPoint 2016 has updated the built-in tool for saving slides as images – and it is really good. But, I still prefer to use the PPTools Image Export add-in. The reason is that the export dialog gives me complete control over the image(s) created.

ImageExport-1

  1. Select the format for the image (I generally use .png for my images)
  2. Select a range of slides or the entire presentation (Note: I do like PowerPoint’s option to export the selected slides, something you can manually type in slide numbers here, but a one-click button would be a great addition)
  3. Easily set a destination for the images
  4. Create a naming structure for the images (This is great when exporting images from different presenters or multiple versions of the same slides)
  5. Set the exported image size!


Find out more about PPTools Image Export tool on the web here.

-Troy @ TLC


By |2016-08-10T08:06:49-07:00June 13th, 2016|Software/Add-Ins|
Go to Top