Resource/Misc

Teams – Presenter View Grid View

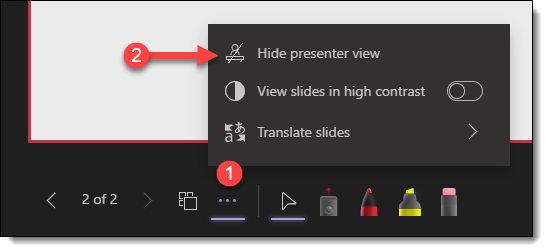
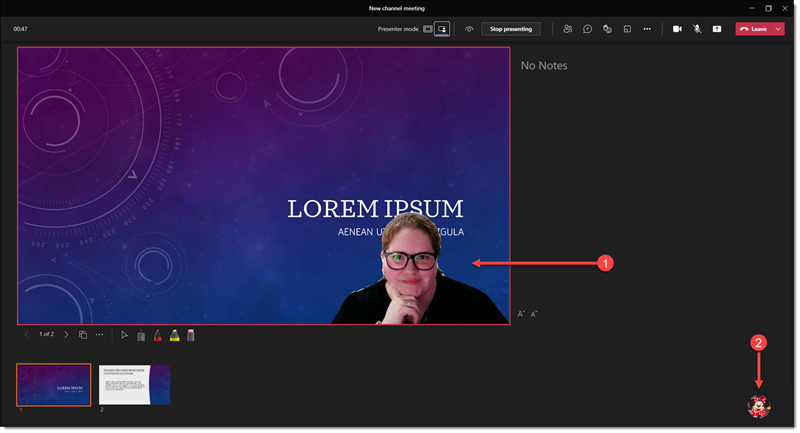
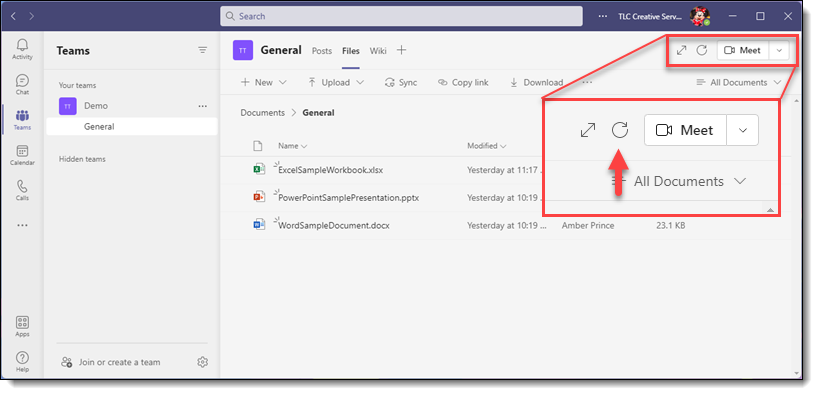
While presenting in Teams via PowerPoint Live, there is a grid view of your presentation so you can see an overview of slides. To show Grid View, you can click the icon in the toolbar under the slides or use the short key G to bring up.

The important thing to know if the audience continues to see the current slide full screen. They do not see the slide sort, or Grid View. In grid view the active slide that the audience is seeing is highlighted with an orange outline.

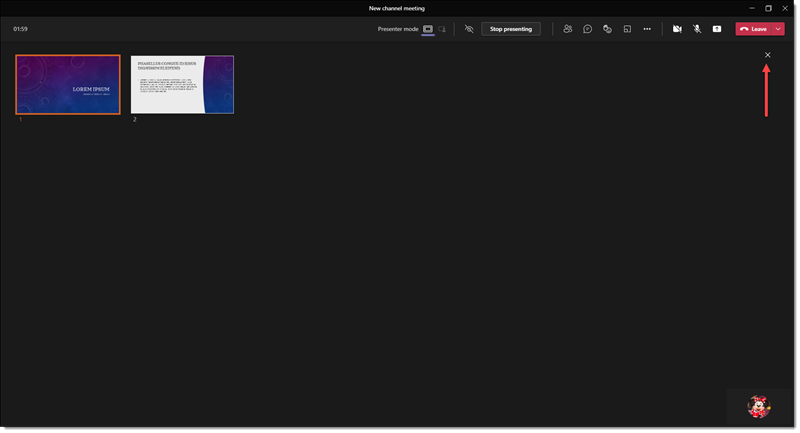
As the presenter, you can click any slide to make that the active presentation slide (eg. go out of order). Or click the X in the upper right hand corner to close Grid View and continue presenting the current active slide.

Troy @ TLC

By |2021-12-18T11:22:07-07:00December 23rd, 2021|PowerPoint, Resource/Misc, Software/Add-Ins|

Podcast Release! “2021’s Top 10’s”

Today releases the final Presentation Podcast episode of 2021! Troy, Nolan and Sandy are saying goodbye to 2021 and each compiled their own Top 10 of 2021 lists. What made the list? PowerPoint features, a client, a specific project, an add-in, a trip – book – or presentation? Listen to it HERE.

By |2021-12-21T10:56:15-07:00December 21st, 2021|Resource/Misc|

Teams – Customize the Teams Presenter View Layout

The Teams version of Presenter View is based on the PowerPoint desktop Presenter View (which needs improvement). Fortunately the Teams dev team is able to pick some of the best part of Presenter View, ignore some of the areas that are not well executed, and add some new features (that are needed in the desktop Presenter View!). At this time, in the Teams Presenter View, if you do not need the presenter notes, the film strip thumbnails along the bottom or Presenter View tools – a presenter can easily hide them.

The default view when presenting a PowerPoint presentation in Teams, is presenter view. Notes are displayed to the right and the film strip thumbnails along the bottom.

If you don’t have any notes or do not need to see the slide thumbnails, there is an option to show slides only. Do this by clicking the 3 dot menu under the active slide (1) and click “Hide Presenter View” (2).

Now the slides are larger, front, and center. You still have access to the tools if needed.

By |2021-12-18T11:17:12-07:00December 20th, 2021|PowerPoint, Resource/Misc, Software/Add-Ins|

Teams – What is “Standout” Mode?

A new feature in Teams, is the Standout mode while presenting. This is a very cool feature, and I am certain just the start of a technology shift that will become a trend in presenting. Standout Model allows your webcam to be superimposed OVER the slides while you’re presenting. AND, it uses a digital green screen to only show you, the presenter on top of your presentation slides.

Here is how to do it.

  1. With your webcam turned on, click the Standout button (second icon in the Presenter Mode section at the top of the screen).
  2. Now your video feed is super imposed over your slides (1) and your regular teams camera view (2) is turned off. Teams will automatically remove your background.

Note: the digital green screen is not going to produce perfect results. Green screen technology itself relies on profession, even lighting – something most office and desk setups do not have. And the digital part of the digital green screen technology is still new and the code will get better and detecting edges and separating the presenter from the background.

Troy @ TLC

By |2021-12-18T11:09:52-07:00December 18th, 2021|PowerPoint, Resource/Misc, Software/Add-Ins|

Teams – Presenting with PowerPoint (part 1)

Microsoft Teams is unique. PowerPoint is not needed to present. Okay, to clarify, PowerPoint for Web is integrated into Microsoft Teams, so the Desktop app of PowerPoint is not necessarily needed to run a presentation. Further, it is more than PowerPoint for Web as Teams offers its own special version of Presenter View. Overall, it is a somewhat tangled and confusing scenario of what application to use, when. I am going to start with what I think is Microsoft’s presenting option they would like us to adopt and use (note: I see advantages and disadvantages).

  1. To present in Teams, you must first be in a Teams meeting (Tip: you can start a meeting with just you in the meeting to test and practice a presentation). Here are the two most common ways of starting a presentation:
    1. Open the presentation from Teams, so it is PowerPoint in Teams. Click “Present in Teams” in the upper right corner of the presentation
    2. From Teams, before opening the presentation, go to “Share Content” in the Teams meeting, navigate down to “PowerPoint Live” then choose a recently opened file or click “Browse” to find another presentation.
  2. In both options, next is Teams launching the presentation
  3. When the presentation opens, it will be a version of Presenter View. In the Microsoft Teams version of Presenter View, the familiar PowerPoint Presenter View layout and options are available. The top band also includes several Teams features. The bottom is the “film strip” preview of slides (similar to PowerPoint for Mac) and presence indicators of who is in the PowerPoint file.

    This is a common confusion area. As a presenter, your Teams meeting is taken over by the presentation Presenter View. However, the audience only sees the 16×9 PowerPoint slides.
    TIP: with this version of Presenter View, your mouse IS NOT seen, even if it over the 16×9 slide area (see below note about the virtual laser pointer).
    TIP: the full slide sorter is available, along with the film strip slide thumbnails.
    TIP: if you do not want Presenter View, you can view the slides full frame (removes presenter notes and film strip thumbnails, but keeps the presentation tools.
  4. The Teams Presenter View re are tools to aid in presenting:

    1. Cursor (click to turn off any of the other tools; laser, marker, highlighter, eraser)
    2. Laser Pointer (use this for the audience to see when you want to “point” to the slides. Click again to turn off or click the Cursor icon to turn off. Click the Laser Pointer to change color)
    3. Marker (default is the red marker, but presenter can choose other colors and marker thickness. Click the marker to change color/thickness)
    4. Yellow Highlighter (Click the highlighter to change color/thickness)
    5. Eraser (used to remove slide inking – from the marker tool)
By |2021-12-01T10:16:38-07:00December 13th, 2021|Resource/Misc|

Teams – Own The File With Check Out!

When working on files hosted on a Team, anyone in the organization with access to the Team can make changes to the files. The ability for everyone to access the file, and collaboration of everyone working in the same file, at the same time, is amazing! BUT, if you want to prevent people from editing a file while you finalize it, or use it for a meeting, the Teams “Check Out” file feature is the solution!

  1. In Teams (also works if open and viewing as a SharePoint list in a browser tab), click the three dot menu next to the file name to show the Action options
  2. Click More then CHECK OUT
  3. To check out the file, no one can have the file open. In this example, I had a copy of the file open and another member tried to check it out but received an error message:
  4. Once you check the file out, you can see a quick indicator of what files you have checked out on the file view. A gray arrow icon (1) indicates someone else has the file checked out. A red arrow icon (2) indicates you have the file checked out.
  5. No one else can make changes to the file including making edits or file properties (renaming or moving the file) while you have the file checked out. Others will be able to view a read only copy of the file on the app or in Teams:

  6. However, they are able to save a COPY of the file to edit or DOWNLOAD a copy of the file to edit and would need to send an updated version to merge edits manually to the checked out file (just so you know what can happen, and the file version control issues that can still come up even with using the Check Out file feature).

Many thanks to Amber on the TLC Creative team for putting together this example! Moving forward we are going to leave the technical side of Teams and continue this Microsoft Teams series with presenting in Teams!

Troy @ TLC

By |2021-12-01T09:25:23-07:00December 10th, 2021|Resource/Misc|

The Teams “Reload” Icon

Sometimes Teams does not display the updated file list right away, which is confusing and frustrating. The files are there, but you can’t see them in the list.

For example, looking at the files list in SharePoint (which always does an automatic refresh and displays the real files view), it shows 4 documents. We added a copy of one of the files in Teams, and SharePoint view displays all 4 files.

SharePoint:

Here is Teams, where the file was added, but it is still displaying only 3 files:

To assure you are seeing an accurate list of files, click the “Reload Tab” or the swirly arrow in the upper right, next to the “Meet” button.

After clicking the Reload Tab button, now all 4 files are displayed in the Teams list!

Microsoft Teams is the newest addition to Microsoft’s offerings and it is evolving quickly (hey, the reload tab button was not in the original release of Teams!). I am hopeful that this blog post becomes outdated and Teams does a better job of refreshing and always displaying an accurate file list. Until then, everyone needs to know about, and use, the Reload Tab button 🙂

Troy @ TLC

By |2021-12-01T09:14:49-07:00December 8th, 2021|Resource/Misc|

New Podcast Episode! #139

Every updated install of Microsoft Office has new visual refresh. The Visual Refresh is not new features, but a new look to all of our Office apps; PowerPoint, Excel, Outlook, Word, etc. Troy, Nolan and Sandy talk about what they see in the refreshed interface, things we like and the things we are not excited about. So, let’s have a conversation about the Microsoft Office Visual Refresh!

Listen to the conversation here.

By |2021-12-06T16:44:55-07:00December 7th, 2021|Resource/Misc|

Setup Teams to Display the File Size

The file explorer in Microsoft Teams does not, by default, show the file size – which I really miss.

To show file size, follow these steps (will need to be done for each separate Team environment)

  1. Click the three dots next to a file and click “Open in Sharepoint”
  2. In SharePoint, click “Return to classic SharePoint” in lower left of screen.
  3. Click “Library” near the top left of screen.
  4. Click “Modify View”.
  5. Find “File Size” in the Column Name list, and check the box and click “OK” in upper right to save changes.
  6. Back in Teams, File Size should now be displayed. You may need to click refresh (Circle Arrow in upper right next to the Meet button) to see changes.
  7. Please note, file size only displays for individual files, not for folders.

Troy @ TLC

By |2021-11-16T16:20:19-07:00December 6th, 2021|Resource/Misc|

Let’s Talk Microsoft Teams This Month

The TLC Creative Services team has over the past 2 years gone from using Microsoft Teams as a novelty, to a more forced use when Microsoft killed off Skype for Business, and now it has become integrated into our daily workflow (and we like it). Like anyone that uses an app a lot, you cringe when you see others not using that app to its fullest. So, here are 10 Microsoft Teams tips to make your use of it hopefully better 🙂

Troy @ TLC

By |2021-11-15T10:51:56-07:00December 1st, 2021|Resource/Misc|
Go to Top