PowerPoint

Happy Thanksgiving!! Having Fun with PowerPoint and Morph Today

Happy Thanksgiving (to everyone in the United States)!!

[videopack id=”15382″]https://thepowerpointblog.com/wp-content/uploads/2021/11/2021-Thanksgiving-Turkey-Animation.mp4[/videopack]

Using morph as the sole animation, I created this fun animation in under 10 minutes. If using motion paths and other “traditional” animation options this would have taken greater than an hour. So, this is really a composite of slide animations; Morph with a very fast .10 second transition duration and all slides set to auto advance instantly.

The only negative to this style of animation is slide count. This 12 second animation is 32 slides.

Troy @ TLC

By |2021-11-11T08:05:04-07:00November 25th, 2021|PowerPoint|

The Office Toolbar – New – Collapse and Expand Options

Here is my standard PowerPoint toolbar configuration. Tabs + Ribbon (toolbar) + QAT

With the Office Visual Refresh, the view options. Click the icon in lower right of the TOOLBAR to show the display options. And my standard toolbar configuration above is the ALWAYS SHOW RIBBON option.

Clicking the FULL-SCREEN MODE option removes everything in the toolbar; tabs, toolbar, QAT. Note: click the very top of the screen, or PowerPoint app window, and the full toolbar temporarily is added over the slide edit view (then click the right icon to show the display options menu).


SHOW TABS ONLY is basically the same view we had previously when the toolbar was collapsed.

And now the SHOW/HIDE QUICK ACCESS TOOLBAR is an option in all 3 of the toolbar display options.  By hiding the QAT, here is my standard toolbar setup without the QAT available (something I would never do!)

Troy @ TLC


By |2021-11-15T09:46:30-07:00November 22nd, 2021|PowerPoint|

Collapse/Expand PowerPoint’s Toolbar – the Legacy Buttons

This blog post is more for our long term memory as the Office Visual Refresh has changed way the toolbar visibility has changed. So when you look at the toolbar (after the Visual Refresh has installed) and think, “this looks different” – well it does and this is what it previously looked like. Two buttons; collapse and a pin to keep it expanded.

Troy @ TLC

By |2021-11-15T09:26:27-07:00November 18th, 2021|PowerPoint|

New PowerPoint Animation!? Basic Zoom Effect Options

So, I do not know the answer to this, but I believe this is something new in the PowerPoint animation options!

Maybe the better question to start with is, does anyone recall if the IN SLIGHTLY and OUT SLIGHTLY effect options to the BASIC ZOOM animation have been there?

I do not recall these options being available and have long used a combination animation of a Zoom + Fade to create the effect (Tip: use the Brightslide PPT add-in “My Animations” to create a quick to apply library of custom animations!). I also reached out to Steve Rindsberg and sent him the above screen capture. He looked in a few legacy installs of PowerPoint and commented that the In Slightly and Out Slightly effect options were not there. So… is this an exciting new addition, or something I just cannot remember was there?

[videopack id=”15397″]https://thepowerpointblog.com/wp-content/uploads/2021/11/BasicZoomEffects.mp4[/videopack]

Troy @ TLC

By |2021-11-13T10:56:45-07:00November 15th, 2021|PowerPoint, Resource/Misc|

Slidewise v1.3 is Here!

First, if you work with presentations from others, I highly recommend having Slidewise installed. For those not familiar with this add-in, Slidewise is the asset manager that PowerPoint has been missing (and it is not for a lack of everyone asking Microsoft for a presentation asset manager!).

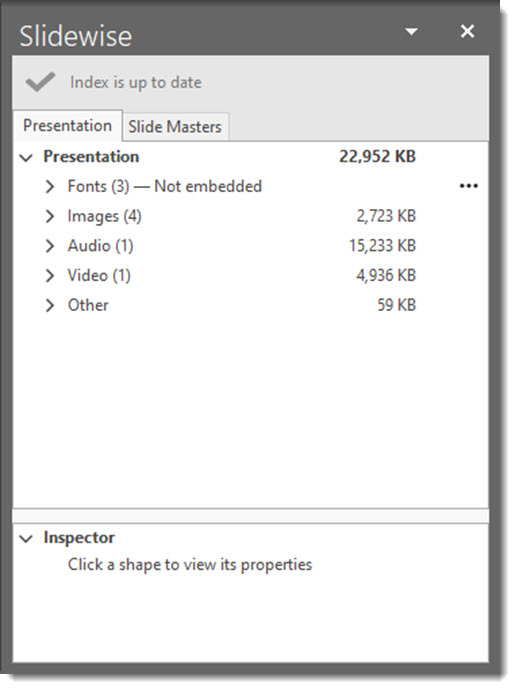
As example, this slide deck uses 3 fonts, has 4 images, has 1 audio file, and 1 video file. All of these details instantly summarized in a single window – the Slidewise info pane. In addition, we can instantly see the file size of everything and expand to see individual assets.

Neuxpower has released v1.2 and v1.3 in rapid succession, and things just get better with each version! Here are a few of my observations on the new version:

The HOME tab now has a show/hide button to bring up Slidewise (same button as on the Slidewise tab, just now also available on the Home tab)

There is now a separate Master slide tab to identify what slides use what master layout. As example, this sample slide deck has 1 master slide, and only 1 master layout. Slidewise displays this in the SLIDE MASTERS tab (1 slide master, 25 slides using the 1 master layout)

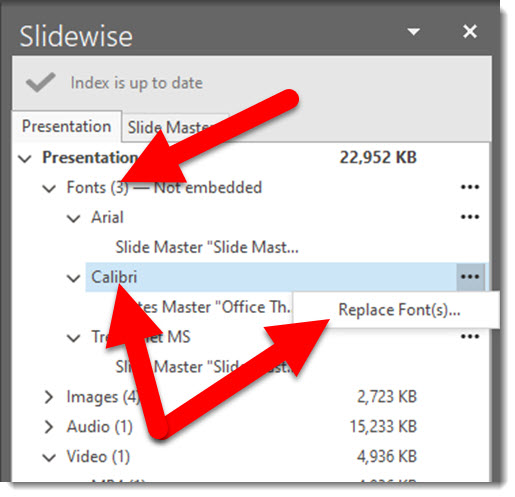
And my favorite feature, which has been in Slidewise since release, is it’s REPLACE FONT system! First, find random fonts with Slidewise identifying the exact slide and exact object where the font is used (amazing!). In addition, the Slidewise Replace Font system is not limited by the single-byte vs double-byte file issue that PowerPoint’s native replace font cannot.

If you have Slidewise, I definitely recommend installing the updated v1.3. Download here.

Get all the info about slidewise at the Neuxpower website here.

Troy @ TLC

By |2021-10-22T08:33:22-07:00October 27th, 2021|PowerPoint, Software/Add-Ins|

The PowerPoint Blog – New Episode!

Jump over to The Presentation Podcast for a great conversation about client questions! Clients ask questions, and many of the same questions. This podcast episode Troy, Nolan and Sandy pose the questions they hear from clients consistently to see if the others also hear the same question – and their answers to those questions.

Listen here.

By |2021-09-07T07:47:05-07:00September 7th, 2021|PowerPoint|

Quotes and Full Frame Images

I am wrapping up this series on slide layout ideas for Quotes and PowerPoint formatting tips with a set of slide layouts created by several designers on the TLC Creative Services team. They all share the concept of using an image that provides an open, focal point area for the quote text to be positioned.

This does not mean each image was ready to use when downloaded. Most were sized, cropped, and positioned to fit the slide. All were cropped to have a focal point area for the quote text. All also used PowerPoint typography for the text.

Troy @ TLC

By |2021-08-22T11:43:06-07:00September 3rd, 2021|PowerPoint|

Quotes and Curved Text

Thank you to Kelli Willcoxson for the inspiration slide.

Design Process:

  • Find an image to support the quote
  • Size, position and crop the image to create a clear area for the quote text
  • Stylize and position the quote text

PowerPoint Formatting Tip:

  • This layout has a lot of custom PowerPoint formatting applied to the text. Easy to do in Adobe Illustrator, a bit harder in PowerPoint.
  • The text is filled with a gradient giving it a subtle blending effect with the background
  • The text also has a subtle glow effect applied, making it seem to glow like the stars in the background
  • But most impressive, and difficult, is the text has a curved layout – using PowerPoint options, and remains 100% editable!
    – Applying the curve effect is a hidden feature in PowerPoint
    – Select the text > go the SHAPE FORMAT tab > go to the WORDART STYLES section of the ribbon > click TEXT EFFECTS > click TRANSFORM (I believe this is the only way to access the text transform feature in PowerPoint) > select a WARP effect, the curve down effect was selected for this slide layout
  • Note: the text warp effect has no interface adjustments, but it is adjustable.
    – By stretching and adjusting the text box the warp changes. As example, make the text box very tall and thin and the curve becomes more pronounced

    – All warp effects have an adjust node, the yellow dot. Sometimes the adjustment is helpful, other times… well, it is obvious we are not using Adobe Illustrator with its greater control options 🙂

Download the editable version of this slide HERE.

Troy @ TLC

By |2021-08-22T11:37:27-07:00September 1st, 2021|PowerPoint, Tutorial|

Quotes with an Overlay Block

Thanks to … for this post’s inspiration slide.

Design Process

  • Locate an image that coordinates with the quote
  • Create a color scheme for the slide (tip: download the editable version of this slide with the link below and look for the awesome image transparency trick!)
  • Create a semi-transparent PowerPoint shape for the quote text
  • Format the quote and attribution text in the PowerPoint shape (no layered text boxes to keep aligned!)
  • Add the quote marks as separate text boxes (okay, not everything can always be formatted in a single text box)

Formatting Tip

  • The text overlay block has transparency so the image can be seen through it, creating a smooth flowing layout
  • Here is the same overlay block on another background to better see its transparency
  • 1 – The image was cropped from the larger original and created the open area for the quote
    2 – The text box has a fill and set to 10% transparency, AND all text is in the single text box
    3-4 – The quote marks are editable text, but are layered on top as separate text boxes to make the unique line spacing and positioning possible

Download the editable version of this slide HERE.

Troy @ TLC

By |2021-08-22T11:13:39-07:00August 30th, 2021|PowerPoint, Tutorial|

Quotes – Rotate the Text

Thanks Kelli (who has moved to another great design job – great for Kelli, sad for TLC Creative) for today’s quote inspiration.

Design Process:

  • This slide started with finding a great image, then researching a quote to use with the image
  • The original image showed more, and it was cropped in PowerPoint to create the layout
  • Typeset the text, select the font, set the size, adjust the line spacing, set the color (pulled from the pink pen in the image)

Formatting Tip:

  • Use PowerPoint’s ability to rotate shapes and text boxes
  • Adjust the angle of any text box by click-and-dragging the rotate icon at the top of the text box, or manually in the FORMAT SHAPE dialog

Troy @ TLC

By |2021-08-22T11:01:44-07:00August 27th, 2021|PowerPoint, Tutorial|
Go to Top