PowerPoint

Download the TLC QAT

The TLC Creative design team leverages the power of the QAT with 64 immediately available tools!

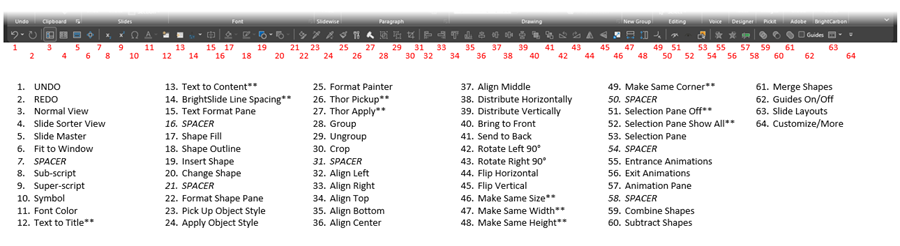
We run the same QAT on every computer, making it easy for our team to work on any computer.

NOTE: the items with the ** indicate this is a third party plugin feature (the icon will show up when installed, but not available if plugin is not installed on that computer). These are a combination of BrightSlide, ToolsToo, and PPTools features.

TIP: A custom QAT can be installed on any rental computer to give it a familiar interface! (if it has a custom QAT, export it and when done with the project, restore the original QAT).

See this previous blog post for how-to import a preset QAT (like the one you can download from the post!): https://thepowerpointblog.com/tlc-powerpoint-qat/

Download the TLC Creative QAT HERE. Note: download is a .zip file.


Troy @ TLC

By |2022-01-14T06:07:27-07:00January 24th, 2022|PowerPoint|

TLC Creatives’s Top 10 of 2021

2021 has overall been a very good year here at TLC Creative Services. Here is a quick slide deck the team created (thank you Amber!) exported as a video showcasing our Top 10 2021 highlights.

[videopack id=”15550″]https://thepowerpointblog.com/wp-content/uploads/2021/12/TLC-2021-Top-10.mp4[/videopack]

Everyone here at TLC Creative Services is looking forward to 2022, and hope 2022 is looking great for you!

By |2021-12-22T12:49:00-07:00December 29th, 2021|Personal, PowerPoint|

Teams – Presenter View Grid View

While presenting in Teams via PowerPoint Live, there is a grid view of your presentation so you can see an overview of slides. To show Grid View, you can click the icon in the toolbar under the slides or use the short key G to bring up.

The important thing to know if the audience continues to see the current slide full screen. They do not see the slide sort, or Grid View. In grid view the active slide that the audience is seeing is highlighted with an orange outline.

As the presenter, you can click any slide to make that the active presentation slide (eg. go out of order). Or click the X in the upper right hand corner to close Grid View and continue presenting the current active slide.

Troy @ TLC

By |2021-12-18T11:22:07-07:00December 23rd, 2021|PowerPoint, Resource/Misc, Software/Add-Ins|

Teams – Customize the Teams Presenter View Layout

The Teams version of Presenter View is based on the PowerPoint desktop Presenter View (which needs improvement). Fortunately the Teams dev team is able to pick some of the best part of Presenter View, ignore some of the areas that are not well executed, and add some new features (that are needed in the desktop Presenter View!). At this time, in the Teams Presenter View, if you do not need the presenter notes, the film strip thumbnails along the bottom or Presenter View tools – a presenter can easily hide them.

The default view when presenting a PowerPoint presentation in Teams, is presenter view. Notes are displayed to the right and the film strip thumbnails along the bottom.

If you don’t have any notes or do not need to see the slide thumbnails, there is an option to show slides only. Do this by clicking the 3 dot menu under the active slide (1) and click “Hide Presenter View” (2).

Now the slides are larger, front, and center. You still have access to the tools if needed.

By |2021-12-18T11:17:12-07:00December 20th, 2021|PowerPoint, Resource/Misc, Software/Add-Ins|

Teams – What is “Standout” Mode?

A new feature in Teams, is the Standout mode while presenting. This is a very cool feature, and I am certain just the start of a technology shift that will become a trend in presenting. Standout Model allows your webcam to be superimposed OVER the slides while you’re presenting. AND, it uses a digital green screen to only show you, the presenter on top of your presentation slides.

Here is how to do it.

  1. With your webcam turned on, click the Standout button (second icon in the Presenter Mode section at the top of the screen).
  2. Now your video feed is super imposed over your slides (1) and your regular teams camera view (2) is turned off. Teams will automatically remove your background.

Note: the digital green screen is not going to produce perfect results. Green screen technology itself relies on profession, even lighting – something most office and desk setups do not have. And the digital part of the digital green screen technology is still new and the code will get better and detecting edges and separating the presenter from the background.

Troy @ TLC

By |2021-12-18T11:09:52-07:00December 18th, 2021|PowerPoint, Resource/Misc, Software/Add-Ins|

Teams – What, The Audience Can See ALL of My Slides!

This is a feature – and one we at TLC Creative are not fond of (at least as the default behavior). While sharing a PowerPoint presentation in Teams, participants can scroll through your slides out of sync from you. This means anyone in the meeting can move through your slides, forward or back, away from the slide you are currently speaking to. They can see ahead, effectively ruining any big reveal. They can be distracted looking at other slide content and not focusing on you and the your presentation. AND, this is the default behavior when you present a slide deck in Teams!

To disable this function, click the eyeball icon next to the “Stop Presenting” button

The eye icon will now have a line through it, indicating it is now disabled.

Troy @ TLC

By |2021-12-18T11:03:51-07:00December 17th, 2021|PowerPoint, Software/Add-Ins|

MS Teams – Open in App

The biggest tip I can offer when using Microsoft Teams is to know about, and use, the “Open in App” feature. This assumes working on a computer with desktop Office apps. The default action is to click on the file name, as example PowerPointSamplePresentation.pptx, and it opens directly in Teams using the Teams version of PowerPoint (which is pretty much PowerPoint for web).

BEFORE clicking on the file name, (1) click the 3-dot menu, or right-click the file name, (2) click OPEN on the popup menu, and (3) click OPEN IN APP. This will change the behavior of opening the presentation directly in the Teams version of PowerPoint and instead, open the presentation in the full desktop app (with all features and toolbars – say yes to the QAT!).

IF you have clicked the file name and the presentation did open in Teams, click the “Open in Desktop App” in the toolbar. This will launch the desktop app and open the file there. Note, the presentation is still connected to teams. Any edits are saved to the Teams file, and others can collaborate on the file.

TIP: the default action of launching a file in Teams can be changed! Click the three dots (or right click) the file name, click “Open”, then click “Change default”

In the pop-up dialog, select “Desktop app” and SAVE.

Now clicking on file will open the file automatically in the desktop app! If you want to open the file directly in Teams, use the 3-dot menu.

Troy @ TLC

By |2021-11-15T11:06:00-07:00December 3rd, 2021|PowerPoint|

Rotating the Feathers

From the previous “Turkey” post, here is the secret to the feather animation.

Morph moves everything based on the object center.  To accomplish the tail feathers fanning out and looking natural, each tail feather needed to have a ‘ghost’ feather added to create a center point that is at the end of the visible feather.

In the above image, the orange feather (really two shapes grouped to make the feather design) is what is seen in the illustration. I duplicated the lighter color orange, which is the larger feather element. Then flipped it and positioned to be a mirror image. Then group all 3 elements. The end of the orange feather is now the center point of the object. The final step is selecting what is grey in the above image and changing it to no fill (eg. transparent).

Play this video to see the center point in use. Note, this animation is the SPIN effect, which also uses the object center. The black dot shows the center point we want the animation to rotate from.

  • The left feather is the one above, with the mirror image feather in the group still grey so it can be seen.
  • The middle feather is the same as the left, but the grey feather is set to no fill (eg. transparent)
  • The right feather is the original feather, which is spinning, but not in accomplishing the visual needed as it is spinning based on its center point (the red dot)

[videopack id=”15390″]https://thepowerpointblog.com/wp-content/uploads/2021/11/2021-Thanksgiving-Center-Spin-Animation.mp4[/videopack]

Troy @ TLC

By |2021-11-11T08:15:52-07:00November 29th, 2021|PowerPoint|
Go to Top